How to Boil, Peel, and Use Up Hard-Boiled Eggs

How To Boil, Peel, and Use Up Hard-Boiled Eggs - a handy guide for Easter or any time.

Last year I posted several articles about hard-boiled eggs. They were some of my most popular posts of all time. Apparently, you people are all about the incredible edible egg! And why not! Eggs are awesome. In honor of the amazing egg, here is a round-up of my best hard-boiled egg posts, as well as some newbies.

Check out this picture sent in by my sister-in-law, Karen, one of my most faithful readers from Wisconsin. It shows the difference between their old method of boiling and peeling eggs and the new method they learned right here at The Simple Homemaker. Now that’s a gorgeous egg!

Eggs

Do you want gorgeous eggs? Easy as pie! Easier, really. Just follow these directions:

How to Boil a Perfect Hard-Boiled Egg

How to Peel Hard-Boiled Eggs

And if you need simple ideas for what to do with all those hard-boiled eggs, here are a few simple recipes from The Simple Homemaker:

Basic Egg Salad Recipe

Deviled Eggs and Stuffed Egg Chicks

10 Ways to Use Leftover Hard-Boiled Eggs

Boiling, Peeling, and Using Up Eggs...in fun ways!

And here are some ideas sent in by some of my blogging friends (and my blogging daughter) from around the globe:

Stacy Makes Cents’ Mama’s Egg Salad – See what a splash of vinegar can do!

Raising the Barrs’ A Salad A Day – Hard-boiled eggs are just one of the ways she spruces up salads.

The Nourishing Home’s Avocado Egg Salad – Really? Yes, really! It looks fabulous!

Horse Crazy Bookworm’s Totally Brilliant Easter Recipes – Technically, not all of these use hard-boiled eggs, but they’re shaped like eggs, and they’re chocolate, so…close enough. (Just go with it.)

For more ideas, I created a Pinterest board entitled Using Up Hard-Boiled Eggs. It’s about using up hard-boiled eggs. Appropriately named, don’t you think? Check it out for more ideas.

Using Up Hard-Boiled Eggs on Pinterest

I hope this egg post is eggsactly what you were looking for.

Grooooaaaaaaannnnnn!

Feel free to link up any of your recipes for leftover hard-boiled eggs in the comments! 

Special thanks to Karen for sending in the results of her egg experiment!

Have You Tried Freezer Cooking? {Review}

Please note: MyFreezEasy gave us a free MyFreezEasy.com Freezer Meal Plan Membership for the purposes of this review. I told them all about our situation and how brutally honest I would have to be, but they gave it to us anyway. They’re either super brave, or they’re super confident about their subscription. Specifically, we are using the Premium Annual Membership. Also, this contains affiliate links (see my note at the bottom about becoming an affiliate after I reviewed the product and loved it).

If you’re a totally normal person, you might prefer to watch the video on the bottom of the FAQ Page or read what other reviewers have to say by clicking on this banner:

MyFreezEasy.com Freezer Meal Plan Membership {MyFreezEasy}
If, however, you are restrained by dietary issues, budgets tighter than my waistband on Thanksgiving, or a kitchen so small your kids think an apartment is a mansion, you’re in the right place.

First, a brief description:

MyFreezEasy is a menu planning subscription service that offers meal plans designed to be frozen for later.

Was that brief enough for you?

Now, some details:

There are a variety of different meal plan options, as you can see on this self-explanatory graphic below…which I will not explain:

MyFreezEasy.com Freezer Meal Plan Membership {MyFreezEasy}
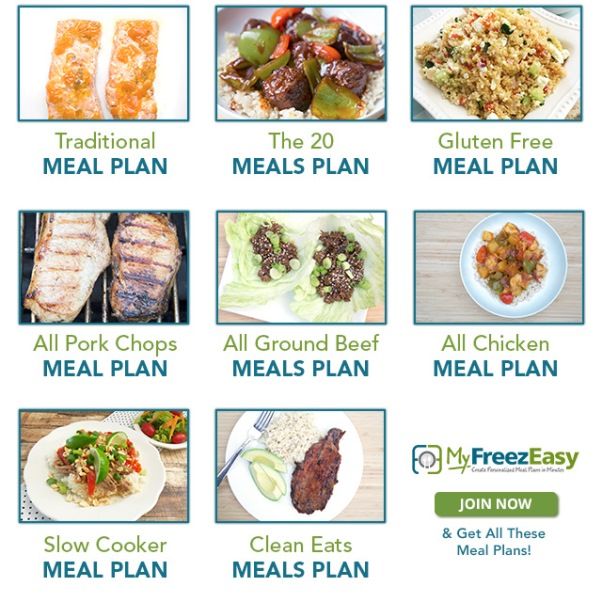
Each meal plan gives you two each of five different meals, except, obviously, the 20-meal plan, which doubles it. You can do that math yourself if you don’t believe me. So, if you follow a meal plan exactly, you will end up with, for example, two chicken taco meals, two Italian chicken meals, two whatever-else-is-on-your-plan meals, for a total of 10. Get it?

The premium plan allows you to swap out meals, essentially building your own plan according to your needs. Of course, if you’re like me, and you subscribe to a meal plan because you don’t want to have to build your own plan, the many options above encompass quite a few needs and preferences. And the meal plans themselves offer gluten-free and dairy-free options to further meet your needs.

There are also a number of printables…like these:

MyFreezEasy.com Freezer Meal Plan Membership {MyFreezEasy}
That includes the following:

  • printable labels with directions on how to prep those beauties you just tucked into your freezer.
  • shopping lists arranged per recipe and per store section.
  • instructions for freezing the meal
  • instructions for making the meal right away (so you can make one and freeze one–you do need to eat on freezer cooking day after all)
  • prep instructions
  • assembly instructions by the recipe or everything at once

There is also a video for each of the meal plans.

Time for our limitations:

We have the following issues which make using a meal plan made by anybody but us difficult at best:

    1. We have a daughter with Crohn’s disease who is on a restricted diet, and no, that doesn’t just mean dairy-free or gluten-free, and no you don’t know what we’re going through just because you’re lactose intolerance or your cat has ulcerative colitis. (Did I just sound off? Sorry.)
    2. We are a family of 10. We eat more food than a family of four. You’re welcome for sharing that obviousness.
    3. We live in a travel trailer and have roughly 250 square feet.
    4. We cook with a single burner and have limited use of ovens and other modern conveniences.
    5. We live on a music missionary’s salary. (Just so you know, music missionaries don’t get a salary–we live off the donations of those who listen to our music and CD purchases.)
    6. Our freezer isn’t much taller than my head.
    7. We don’t really have good printer access.
    8. We don’t have good internet access.
    9. We have an eratic schedule and time constraints.

Want to know how MyFreezeEasy meals measured up?

Let’s tackle each issue one by one.

1. Restricted diet.

See that Clean Eating Plan? We used it. In September, it was great! Hannah can’t eat potatoes, so I cooked those separately, but otherwise we could all eat every meal exactly as written. Those of you who have to cook a variety of foods for a variety of conditions are in tears of joy with me right now, aren’t you?

In October, I was super excited to check out the Clean Eating plan, but alas, the spinach burgers had bread crumbs in–two cups! That ain’t clean eatin’ in our book, so I had to swap that out. Another recipe used taco seasoning and yet another used vinaigrette dressing. Because I don’t have any of those things on hand and can’t easily find them, I have to look up another recipe or (as I do) make something up. I was bummed to have to resort to that again.

That said, it wasn’t a huge deal, since I’m used to it. I still would have so much preferred they used real, clean ingredients instead of blends and bottles. With the premium membership, of course, you can swap out, but I don’t want to do that. I want to open, shop, prep, and cook. Probably not an issue for most of you. So, five stars in September, four in October.

2. Lots of mouths to feed.

The plans are adjustable. Feed as many or as few people as you want. I used the plans as written for four people and simply fed both bags of food to my hordes, with a few extra veggies, taters, or meat pieces.

3. Space.

Prepping really didn’t take up that much space. I had my chopper set up at the table and I worked at the counter in my “red zone.” (My red zone is where I work with raw meat. I set out a red cutting board and everyone knows the cooties will be flying in that space. All raw meat action happens on that cutting board. When I’m finished, I disinfect whatever I used.) It worked great.

What kind of chopper do I use, you ask? This kind:

img_20161002_225642

An eight-year-old with a good knife and an even better attitude. Works for me! If you have a power chopper, it’s probably faster, but less fun.

4. Limited cooking appliances.

We did not cook all the meals exactly as we were instructed. If you’ve been living like us, however, and someone says roast this or grill that or bury this in the ground and unearth it three months later, you are accustomed to adapting. We popped things in the pressure cooker instead of a crock pot or oven and threw everything else in a pot o nthe burner. It worked.

Would it have been better roasted, for example, probably. Was it bad not roasted? Not at all.

5. Budget.

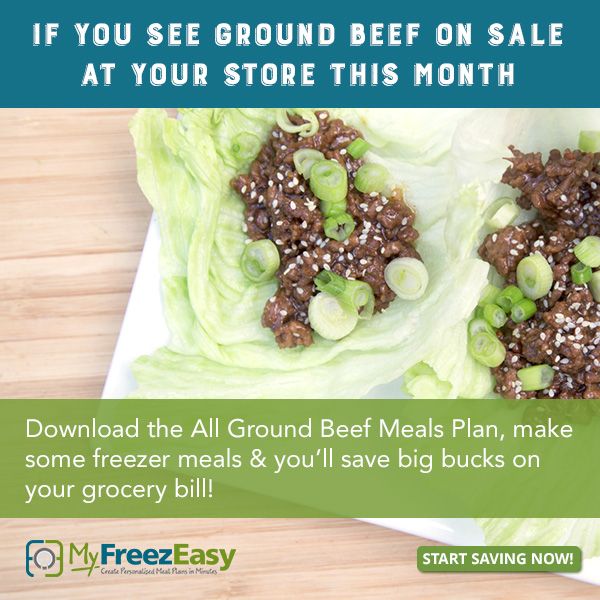
Here’s where the rubber meets the road and why I have never before told you guys to follow an already prescribed meal plan instead of making your own. I buy food that’s on sale and build my menu according to sales and what I already have on hand. Buying the food for the September meal plan was more expensive than my approach. Fact. For October, however, I switched things up a little and substituted meats and other ingredients based on sales. So, whereas the menu called for ground chicken, I found a good deal on ground beef, and whereas another recipe called for chicken breasts, I found manager’s special beef steaks for less. So, I swapped out.

Plus, MyFreezEasy offers three plans based on whatever’s on sale–the chicken, beef, and pork plans. That right there is going to save you a lot of money, since you probably have many or most of the other ingredients in your pantry already–there’s nothing out of the ordinary on these plans, no squid eyeball ink.

MyFreezEasy.com Freezer Meal Plan Membership {MyFreezEasy}

6. Freezer space.

I told you my freezer isn’t much taller than my head. See:

20161012_095559

Okay, so that picture is from the outside of the freezer. The inside is much, much smaller. I didn’t show you the inside, because I’m embarrassed by the sheer quantity of frozen chocolate in there. Mmmmm…chocolate. (As an aside, this is Hannah’s homemade chocolate–so good! No sugar. Yum!) It also contains frozen veggies and fruit, which takes up pretty much all the space. So, with the chocolate and produce, there isn’t a ton of room for freezer meals.

That is a problem that’s hard to work around. Fortunately, because we used two bags as one meal instead of two, we were able to store some in the freezer and some in the fridge (why does that word have a “d” in it?). We ate the fridge meals first.

Also, lucky us, our refrigerator freezes things during some times of the year, so, like lettuce becomes frozen lettuce sludge in twelve hours. That comes in handy when storing freezer meals in the fridge.

Finally, the meals in the bags take up less space than the ingredients in their separate packaging. If you get on the stick and prep the meals right away, you don’t need room to store all that meat, and that provides more room in the fridge and freezer.

7. Printer

We didn’t print. It still worked fine. Between my Sharpie marker and my sharp memory, it was just fine. (I don’t have a sharp memory. That was a leeeeetle joke. A very leeeetle joke.)

8. Internet access.

Again, this is as sketchy as my memory, so watching the videos was not always possible. Who cares! I did it without the videos. No problem!

9. Time

We are busy. We never know when we’ll be called on to be somewhere that isn’t “home” and how long arriving at our next destination will really take, since Google doesn’t know everything. Still, it took only an hour to bag these meals, and a few minutes to throw them in the pots. No biggie!

Having the shopping list ready made shopping a breeze.

Now the big question:

How was the food?

If you’re not already cooking for your family, they are going to be blown away. If you are, you might find a few meals that will be bumped into family favorites or a regular rotation–it really depends on the family preferences and the meals.

My family enjoyed all the meals (even the lentil stew I accidentally made with unlabeled split-peas, since neither my marker nor my mind were on duty the day I repackaged those). Okay, so my hubby doesn’t eat lentils, but the rest of us were good! There is one from the first month that I will be making again, and we haven’t eaten the second month’s stash yet.

My one gripe:

As you know, my one gripe is the three processed ingredients in the Clean Eating plan. If you have a source for safe processed ingredients, you’re good, but in my experience those are more expensive, so we make them ourselves. Having the single ingredients listed instead of, say, vinaigrette or taco seasoning, would make this gripe vanish like Hannah’s chocolate!

Still, five stars!

You know something–this link right here is an affiliate link to join MyFreezEasy. You know something else–I didn’t hunt down an affiliate link until after I had published this post. In other words, I like it, I want to promote it, so I found an affiliate link for it, not the other way around where people promote it whether they like it or not.

I’m outta here! Happy eats!


Save

Save

Save

Save

Save

Save

Save
Crew Disclaimer

Save

Save

Save

Christy’s Simple Tips: Using Clothespins to Close Bags

Clothespins Pinnable

Instead of bulky, cumbersome chip clips or annoying little twist ties which were created only to aggravate parents of hungry children at lunch time, use clothespins to close bags in your kitchen. Simply fold down or twist the bag and attach a clothespin or two.

If the item belongs to one person in particular, use a permanent marker to write a name on the clothespin.

If you want to get really fancy (which is kinda the opposite of simple, but this is a great idea, so I’m going with it), paint the flat surface of the clothespin with chalkboard paint so you can write on it with chalk. Chalk is fun. Clothespins are fun. This is a win-win.

You could also spruce up your supply a bit by covering your entire house table with newspaper, setting out paints and markers, and letting your kids get in touch with their inner Monet and Picasso on your clothespins.

Snag a bag of 50 to 100 clothespins at most discount stores, department stores, or drugstores for only a buck or two. Some are better quality than others, but the cheapies are just fine for this purpose…even if they’re not sturdy enough for the job for which they were originally created.

I keep a small bin of clothespins in my “baggie” drawer where they don’t take up too much space.

Contact me if you would like your simple tip featured on Christy’s Simple Tips.

How to Find Pick-Your-Own Farms in Your Area

How to Find Pick-Your-Own Farms in Your Area


Summer is upon us. It happens every year. I’m not sure why I’m surprised.

One of the best parts of summer in my hungry humble opinion is the availability of fresh produce. Fresh blows the roots off anything you can find in the grocery store.

I’ve been shocked to learn that my suspicious nature has been proven correct at farmers’ markets–some venders are receiving supplies from the same places as the grocery stores. Say wha?! That’s what I read. While the farmers’ markets are still a great option, because you can find any number of legit, hard-working farmers peddling their wares, here’s another option for you:

Pick-your-own farms.

Pick your own farms are abundant throughout the country…except maybe the desert. Here’s what I love about pick-your-owns:

  • You know exactly how fresh the food is.
  • You know exactly where the food came from, right down to the stem on the plant in the row in the field.
  • The prices are almost always significantly lower than anything you’ll find in the grocery stores, and almost always cheaper than the farmers’ markets as well.
  • It is educational. Your kids get out of the house, away from the city, and out onto the land to see where food really comes from.
  • It smells good–the dirt I mean, and the strawberries, and everything else. Maybe it’s because I grew up on a farm, but I love the smell of rich dirt.
  • Your kids can get dirty. Your kids should get dirty. Your kids need to get good and dirty as often as possible. It’s good for their immune systems. It’s good for their kid-ness. It’s just plain good for them to be outside getting sun and fresh air and, yes, dirt, without anyone telling them not to muddy their $65 shoes. Get the $12 Walmart shoes and the $2 thrift store jeans and let the kids get dirty for the love of all things real!
  • Your children are far more likely to try something new if they had a hand in it somehow. That hand can be as simple as selecting it at the grocery store, but the stakes are upped even more if they planted it or picked it themselves.
  • It counts as exercise! Woo hoo! Squats for strawberries, toe raises for cherries and apples.
  • The farmers are right there–you can ask them what goes on their plants and if they’re in bed with MonSatan MonSanto.
  • It’s wholesome family fun. Whee!

Those dirt comments totally made you want to find a pick-your-own farm near you, didn’t they? Good! Check out this website:

PickYourOwn.org

It has to be one of the worst looking sites I’ve run across in quite some time. It totally needs a rehab. I hate it. At the same time, I love it! It shares PYO (I got tired of writing pick-your-own) farms all over the country, and you can search by state and county. Each farm has a write-up and places to go for additional information. It rocks in its out-dated ugliness. Go check it out.

You can also run a quick search of your own region on Google or (my favorite search engine, since it helps me pay for Christmas presents just by searching) Swagbucks {affiliate link}. Just type in “Pick your own farms in Smyrna, Tennessee”…or wherever you live, since I’m pretty sure you don’t all live in Smyrna–nice place though.

Happy picking! I’ll see you in the fields!

What is your experience with pick-your-own farms?

How to Find Pick-Your-Own Farms in Your Area

Save

Save

Save

Cure Anemia Naturally With These Top Foods Rich in Iron

Cure anemia naturally with these top foods rich in iron. No more sleepy mama!


My daughter with Crohn’s often has to battle anemia, and I occasionally have the same problem, like right now. My daughters were excited to jump on the natural healing train when they heard my recent anemia diagnosis, and they immediately began filling my tired self with molasses and homemade chocolate, because that’s what we do–heal ourselves with food.

For those of you interested in battling the debilitating exhaustion of anemia with food, I’ve got a reasonable list of fairly normal foods rich in iron.

Iron is present in both animal and plant foods, and it does make a difference which you consume. We’ll break them up into those two categories, because categories are fun. Whee!

Top Animal-Based Foods Rich in Iron

Animal sources contain heme iron which is highly absorbable at a rate of around 30%. You do not need to eat these foods in combination with anything else to improve absorption, although you may consider not simultaneously eating the iron absorption inhibitors conveniently listed at the end of this article.

  • Organ meats
  • Beef (your best bet)
  • Lamb and pork
  • Poultry
  • Seafood (shellfish is significantly higher than fin fish)
  • Eggs (chicken are the highest, but others rank well)
  • Dairy does have some level of iron in it, but calcium is an inhibitor, so…there ya go.

I’m totally aware that I just listed all the normal available animal foods in the stores.

Top Plant-Based Foods Rich in Iron

Plant sources contain non-heme iron, which absorbs at a rate of about 5%. Not very impressive, is it? You can improve the absorption by eating these products in conjunction with a meat source (especially beef), vitamin C, and citric acid.1

  • lentils
  • beans
  • tomatoes
  • potatoes (leave the skin on)
  • spinach
  • pumpkin
  • sesame seeds
  • pumpkin seeds
  • chickpeas (check out my favorite hummus recipe)
  • dried fruit
  • nuts
  • coconut
  • rice
  • wheat flour
  • oats
  • these other grains
  • molasses
  • cocoa, especially dark

Iron-Absorption Inhibitors

The following foods often prevent or decrease the absorption of iron. Ironically, some of them are excellent sources of iron. Confusing, isn’t it? Kinda like wondering whether you should wash that red and white striped shirt with the whites or the darks. The best advice this non-medically-trained mama can give you is to avoid these foods during a high-iron meal, but not in general, since a well-rounded diet is your best friend (and you thought it was your dog).

  • protein from the yolk and white of eggs (strangely, some people cure anemia by upping their yolk intake)
  • cocoa (do not tell my girls–I’m enjoying the indulgence)
  • phytic acid–this is a common mineral stripper found in the bran of grains, legumes, and other plants that can be reduced by soaking or fermenting.
  • dairy because of the calcium
  • magnesium, zinc, copper
  • tannic acid found in tea
  • peppermint or chamomile
  • coffee–so don’t have a coffee with your porterhouse steak, ‘kay?

Why Not Just Take a Supplement?

While Hannah was prescribed a supplement and took it religiously while anemic so as not to further incite the wrath of her doctor who was not 100% on board with our dietary approach to healing, I do not. Here’s why:

  • I already have to eat. Why not eat smarter!
  • Iron supplements are notorious for causing constipation, which is something Crohnsies and pregnant women battle anyway–why make it worse?
  • Supplements cost money–again, I’m already buying food.
  • Many supplements are not very absorbable.
  • Some of them are stinky–blech. (Okay, that doesn’t really stop me, but it might stop, say, your three-year-old.)

1. Source

Check here for a more thorough list of iron-rich foods that takes considerably longer to read; optionally, go eat a steak.

What are your best tips for fighting anemia? A strong upper left hook?

That lame joke reminds me of a quote from one of my children: “Mommy, would you like some crackers to go with your jokes?” I do get pretty cheesy.

Photo credit (without text)

Save

Simple {Nearly} Messless S’mores

Simple {Nearly} Messless S'mores -- Only two ingredients and a mind-blowing technique!


S’mores are fun, but let’s face it. They’re messy!

Here’s a simpler version that won’t get quite as many stains on the shirts and goo in the hair.

Ingredients:

Simple {Nearly} Messless S'mores -- Only two ingredients and a mind-blowing technique!

  • Cookies with a hole in the middle and chocolate on at least one side. From here on out they will be referred to as “striped dainties,” because that’s what we called them when we were small and couldn’t read the boring name on the package.
  • Jet-Puffed marshmallows. This is not the time to be skimpy and buy the cheaper varieties. They are not as good! We’re talking s’mores here, people! Step up to the plate!
  • A stick or poker that will fit through the cookie hole. The double mallow roasters won’t work here, nor will the self-rotating triple or quadruple mallow contraptions.

Simple {Nearly} Messless S'mores -- Only two ingredients and a mind-blowing technique!

Directions:

1. Select the cookie that calls your name and “thread” the stick through the center hole with the chocolate-covered side facing away from you. This cookie is covered in chocolate on both sides, so use your imagination.

Simple {Nearly} Messless S'mores -- Only two ingredients and a mind-blowing technique!

2. Run the cookie down toward the handle of your roasting stick.

Simple {Nearly} Messless S'mores -- Only two ingredients and a mind-blowing technique!

3. Find just the right marshmallow…not too sticky, not too firm.

Simple {Nearly} Messless S'mores -- Only two ingredients and a mind-blowing technique!

Oops.

Simple {Nearly} Messless S'mores -- Only two ingredients and a mind-blowing technique!

Find just the right marshmallow again and spear it with the stick.

Simple {Nearly} Messless S'mores -- Only two ingredients and a mind-blowing technique!

4. Roast that marshmallow to perfection.

Simple {Nearly} Messless S'mores -- Only two ingredients and a mind-blowing technique!

5. Now it’s time for the removal and sandwiching. I like to combine this step into one smooth move, while my husband prefers to defy gravity with his impeccable balance skills.

If I were doing this, I would at this point place my second striped dainty on the stick with the chocolate side facing the mallow, and then proceed as my man indicates.

Move the striped dainty from the bottom of the stick toward the marshmallow, and slowly push it and the mallow off the end of the stick. Ignore the dog in the background saying, “Drop it, drop it, drop it.”

Simple {Nearly} Messless S'mores -- Only two ingredients and a mind-blowing technique!

Simple {Nearly} Messless S'mores -- Only two ingredients and a mind-blowing technique!

Perfect!

Simple {Nearly} Messless S'mores -- Only two ingredients and a mind-blowing technique!

6. If you haven’t already, sandwich that baby!

Simple {Nearly} Messless S'mores -- Only two ingredients and a mind-blowing technique!

Done…almost.

Simple {Nearly} Messless S'mores -- Only two ingredients and a mind-blowing technique!

There’s this one last step:

7. Eat it!

Simple {Nearly} Messless S'mores -- Only two ingredients and a mind-blowing technique!

Simple {Nearly} Messless S'mores -- Only two ingredients and a mind-blowing technique!

Simple {Nearly} Messless S'mores -- Only two ingredients and a mind-blowing technique!

Simple {Nearly} Messless S'mores -- Only two ingredients and a mind-blowing technique!

You can also eat them open-faced.

Simple {Nearly} Messless S'mores -- Only two ingredients and a mind-blowing technique!

Take s’mores to another level with other chocolate-covered cookies instead of grahams. Obviously, cookies without holes can’t be threaded onto the stick, so there’s more hand/mallow contact. I’m thinking that if you cared about hand/mallow contact, you probably wouldn’t be eating s’mores.

Simple {Nearly} Messless S'mores -- Only two ingredients and a mind-blowing technique!

Open up an Oreo and pop a mallow inside—licking the cream out first is optional. Or try mint cookies—it’s like a trip to the moon without the G-force.

Simple {Nearly} Messless S'mores -- Only two ingredients and a mind-blowing technique!

Why is this “better” than traditional s’mores?

  1. Scientifically, when compressed by the top element, the mallow has someplace to go besides oozing out the sides of the cracker sandwich. Some of it pushes up through the hole while some pushes toward the edges. This way, you have less sideways mallow displacement and better overall mallow coverage for a proper mallow/cookie/chocolate ratio in each bite.
  2. You have to buy and deal with one less ingredient.
  3. The chocolate melts every time.
  4. The chocolate does not drip out all over your daughter’s pale yellow shirt and stain it forever because you’re out of stain remover and the shirt somehow gets stuffed into the bottom of the sleeping bag and lost for three months.
  5. It’s a cookie. Cookies are good.
  6. They’re less messy…although admittedly not mess-free.
  7. It isn’t as intensely rich as a traditional s’more, believe it or not, so you can eat more. That might not be a good thing.
  8. Circles are fun.
  9. You can obtain complete cookie coverage with one mallow.
  10. Your s’mores world opens up to dozens if not hundreds of variations.
  11. It’s fun…more fun than a box of graham crackers.

Please note the unmelted chocolate, the mallowy face, and the massive sideways mallow displacement in the following pictures.

Simple {Nearly} Messless S'mores -- Only two ingredients and a mind-blowing technique!Simple {Nearly} Messless S'mores -- Only two ingredients and a mind-blowing technique!Simple {Nearly} Messless S'mores -- Only two ingredients and a mind-blowing technique!Simple {Nearly} Messless S'mores -- Only two ingredients and a mind-blowing technique!

Please note: This does not work with cauliflower.

Simple {Nearly} Messless S'mores -- Only two ingredients and a mind-blowing technique!

Special thanks to my s’mores team for enduring two nights of s’mores experimentation. I know it was a strain!

What’s your best s’more recipe or tip?


.

Jalapeno Popper Grilled Cheese Sandwiches

In honor of National Grilled Cheese Sandwich Day (April 12), I created this amazing jalapeño popper grilled cheese sandwich after seeing this juiced-up version on Pinterest. The original uses goat’s cheese and requires me to roast jalapenos. I’m sure it’s totally fantastic, but goat’s cheese is not a part of my current reality. Also, I travel the country in a travel trailer with my hubby and eight kids; I’m not roasting jalapenos.

Jalapeno Popper Grilled Cheese Sandwich


My version is simpler, requires fewer ingredients, and is much faster, all making it perfect for The Simple Home. Plus, all my testers loved it…and some of them asked for seconds. After all votes were counted and recounted, it was unanimously announced a keeper!

Ingredients for four sandwiches:

  • eight slices sourdough bread (or try my simple homemade bread)
  • 1 8-ounce package cream cheese
  • 1 12-ounce package bacon (or 16 ounces…ahem)
  • 1 jalapeno
  • 4 tablespoons butter

Ingredients for Jalapeno Popper Grilled Cheese Sandwiches


Directions for making a jalapeño popper grilled cheese sandwich:

1. Cut the bacon into 1-inch pieces and toss it into a frying pan. I use my Cutco kitchen shears and cut it directly into the pan, but, as my teenaged daughter reminded me when I was making this sandwich, my way is not the only way, so do whatever you want, people, but you can’t have my car keys! Fry until done. Remove from pan, but leave at least a tablespoon or so of grease in the pan.  (Or fry first, cool, and crumble.)

Jalapeno Popper Grilled Cheese Sandwich

2. Mince the jalapeño. Common precautionary practices for dealing with jalapeños involve wearing gloves. I don’t wear the gloves because I’m smart enough not to touch my face after dealing with a jalapeño…at least I used to be smart enough…until today. Next time I’ll be wearing gloves.

3. Toss the jalapeño into the frying pan with the bacon grease for about 10 seconds, long enough to warm it through. The longer you heat the jalapeño, the more it releases the heat, so keep that in mind.

4. Spread one ounce of cream cheese on each slice of bread. Add a little love.

Jalapeno Popper Grilled Cheese Sandwiches

5. Divide the bacon and jalapeño between four slices of bread. Cover each with another piece of bread…to make a sandwich, ya know.

Jalapeno Popper Grilled Cheese Sandwich

6. Spread butter on the outside of the sandwiches. This is optional. Okay, it’s butter–it’s not optional.

7. Grill for about four minutes per side. (Times will vary. Don’t leave your masterpiece unattended!) On the road I pop them into a George Foreman indoor grill or “grill” them in the pan where I fried the bacon–its a good way to go. In my old life I used a griddle. You can also use a panini maker, frying pan, outdoor grill, or open fire. You could even “grill” them in the oven!

Adjust everything to your liking and feel free to play with ingredients, but don’t bother trying to go low-fat. Or at least, if you do, don’t tell me about it.

Jalapeño Popper Grilled Cheese Sandwiches go great with homemade tomato basil soup. Don’t they make a cute couple?

Jalapeno Popper Grilled Cheese Sandwich via The Simple Homemaker

Here’s the boring printable version:

Jalapeno Popper Grilled Cheese Sandwiches
Recipe Type: Sandwich
Author: Christy, The Simple Homemaker
Prep time: 12 mins
Cook time: 8 mins
Total time: 20 mins
Serves: 4
Hot, creamy, delicious! This sandwich is everything you could want in a grilled cheese. You can even pretend the jalapeno will fulfill your daily veggie requirements.
Ingredients
  • eight slices sourdough bread
  • 1 8-ounce package cream cheese
  • 1 12-ounce package bacon
  • 1 jalapeno
  • 4 tablespoons butter
Instructions
  1. Cut the bacon and toss it into a frying pan. Fry until done. Remove from pan, but leave the grease in the pan.
  2. Mince the jalapeno.
  3. Toss the jalapeno into the frying pan with the bacon grease for about 10 seconds to warm it through.
  4. Spread one ounce of cream cheese on each slice of bread.
  5. Spread the bacon and jalapeno over four pieces of bread and make a sandwich using the other piece of bread.
  6. Spread butter on the outside of the sandwiches.
  7. Grill for about four minutes per side. (Times will vary.)

Could you, maybe, make one for me?

What’s your favorite way to do grilled cheese sandwiches?

Did you know that pinning this not only helps you figure out what to make for dinner, but it helps my blog? True story! Thanks for sharing!

Jalapeno Popper Grilled Cheese Sandwich