Simple {Nearly} Messless S’mores

Simple {Nearly} Messless S'mores -- Only two ingredients and a mind-blowing technique!


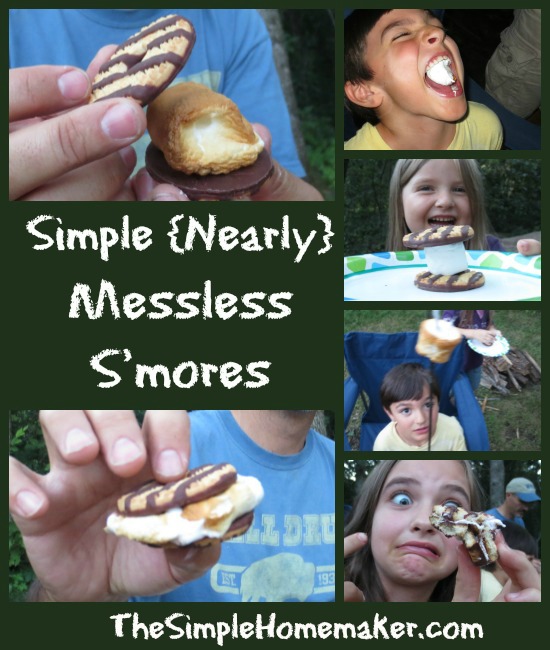
S’mores are fun, but let’s face it. They’re messy!

Here’s a simpler version that won’t get quite as many stains on the shirts and goo in the hair.

Ingredients:

Simple {Nearly} Messless S'mores -- Only two ingredients and a mind-blowing technique!

  • Cookies with a hole in the middle and chocolate on at least one side. From here on out they will be referred to as “striped dainties,” because that’s what we called them when we were small and couldn’t read the boring name on the package.
  • Jet-Puffed marshmallows. This is not the time to be skimpy and buy the cheaper varieties. They are not as good! We’re talking s’mores here, people! Step up to the plate!
  • A stick or poker that will fit through the cookie hole. The double mallow roasters won’t work here, nor will the self-rotating triple or quadruple mallow contraptions.

Simple {Nearly} Messless S'mores -- Only two ingredients and a mind-blowing technique!

Directions:

1. Select the cookie that calls your name and “thread” the stick through the center hole with the chocolate-covered side facing away from you. This cookie is covered in chocolate on both sides, so use your imagination.

Simple {Nearly} Messless S'mores -- Only two ingredients and a mind-blowing technique!

2. Run the cookie down toward the handle of your roasting stick.

Simple {Nearly} Messless S'mores -- Only two ingredients and a mind-blowing technique!

3. Find just the right marshmallow…not too sticky, not too firm.

Simple {Nearly} Messless S'mores -- Only two ingredients and a mind-blowing technique!

Oops.

Simple {Nearly} Messless S'mores -- Only two ingredients and a mind-blowing technique!

Find just the right marshmallow again and spear it with the stick.

Simple {Nearly} Messless S'mores -- Only two ingredients and a mind-blowing technique!

4. Roast that marshmallow to perfection.

Simple {Nearly} Messless S'mores -- Only two ingredients and a mind-blowing technique!

5. Now it’s time for the removal and sandwiching. I like to combine this step into one smooth move, while my husband prefers to defy gravity with his impeccable balance skills.

If I were doing this, I would at this point place my second striped dainty on the stick with the chocolate side facing the mallow, and then proceed as my man indicates.

Move the striped dainty from the bottom of the stick toward the marshmallow, and slowly push it and the mallow off the end of the stick. Ignore the dog in the background saying, “Drop it, drop it, drop it.”

Simple {Nearly} Messless S'mores -- Only two ingredients and a mind-blowing technique!

Simple {Nearly} Messless S'mores -- Only two ingredients and a mind-blowing technique!

Perfect!

Simple {Nearly} Messless S'mores -- Only two ingredients and a mind-blowing technique!

6. If you haven’t already, sandwich that baby!

Simple {Nearly} Messless S'mores -- Only two ingredients and a mind-blowing technique!

Done…almost.

Simple {Nearly} Messless S'mores -- Only two ingredients and a mind-blowing technique!

There’s this one last step:

7. Eat it!

Simple {Nearly} Messless S'mores -- Only two ingredients and a mind-blowing technique!

Simple {Nearly} Messless S'mores -- Only two ingredients and a mind-blowing technique!

Simple {Nearly} Messless S'mores -- Only two ingredients and a mind-blowing technique!

Simple {Nearly} Messless S'mores -- Only two ingredients and a mind-blowing technique!

You can also eat them open-faced.

Simple {Nearly} Messless S'mores -- Only two ingredients and a mind-blowing technique!

Take s’mores to another level with other chocolate-covered cookies instead of grahams. Obviously, cookies without holes can’t be threaded onto the stick, so there’s more hand/mallow contact. I’m thinking that if you cared about hand/mallow contact, you probably wouldn’t be eating s’mores.

Simple {Nearly} Messless S'mores -- Only two ingredients and a mind-blowing technique!

Open up an Oreo and pop a mallow inside—licking the cream out first is optional. Or try mint cookies—it’s like a trip to the moon without the G-force.

Simple {Nearly} Messless S'mores -- Only two ingredients and a mind-blowing technique!

Why is this “better” than traditional s’mores?

  1. Scientifically, when compressed by the top element, the mallow has someplace to go besides oozing out the sides of the cracker sandwich. Some of it pushes up through the hole while some pushes toward the edges. This way, you have less sideways mallow displacement and better overall mallow coverage for a proper mallow/cookie/chocolate ratio in each bite.
  2. You have to buy and deal with one less ingredient.
  3. The chocolate melts every time.
  4. The chocolate does not drip out all over your daughter’s pale yellow shirt and stain it forever because you’re out of stain remover and the shirt somehow gets stuffed into the bottom of the sleeping bag and lost for three months.
  5. It’s a cookie. Cookies are good.
  6. They’re less messy…although admittedly not mess-free.
  7. It isn’t as intensely rich as a traditional s’more, believe it or not, so you can eat more. That might not be a good thing.
  8. Circles are fun.
  9. You can obtain complete cookie coverage with one mallow.
  10. Your s’mores world opens up to dozens if not hundreds of variations.
  11. It’s fun…more fun than a box of graham crackers.

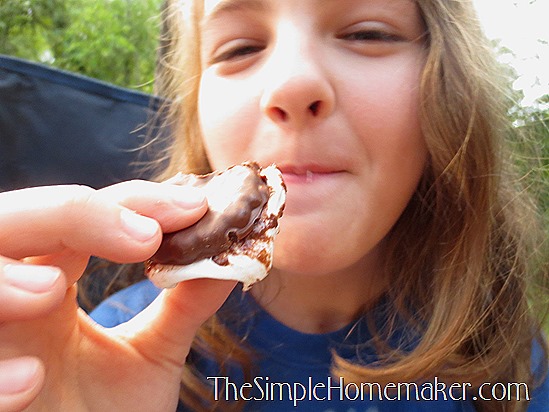
Please note the unmelted chocolate, the mallowy face, and the massive sideways mallow displacement in the following pictures.

Simple {Nearly} Messless S'mores -- Only two ingredients and a mind-blowing technique!Simple {Nearly} Messless S'mores -- Only two ingredients and a mind-blowing technique!Simple {Nearly} Messless S'mores -- Only two ingredients and a mind-blowing technique!Simple {Nearly} Messless S'mores -- Only two ingredients and a mind-blowing technique!

Please note: This does not work with cauliflower.

Simple {Nearly} Messless S'mores -- Only two ingredients and a mind-blowing technique!

Special thanks to my s’mores team for enduring two nights of s’mores experimentation. I know it was a strain!

What’s your best s’more recipe or tip?


.

Homemade Hot Cocoa Recipe

I don’t drink cocoa, because it gives me gas. I’m glad we cleared the air on that sensitive topic.

Snicker.

Moving on.

The thing I love about homemade hot cocoa is that it’s simple to put in the dairy or non-dairy products and sweeteners that you wish to meet everybody’s needs and preferences. Blah blah blah. What I really like is that it tastes so stinkin’ awesome!

Simply Delicious Hot Cocoa Recipes with Dairy-Free Alternatives

I’m giving you a basic recipe which is great as it is, because I’m all about simple, or it can be spruced up or adjusted. It’s your job to alter it to your needs and liking.

Homemade Hot Cocoa

Ingredients:

  • 1/3 cup cocoa powder
  • 1/3 to 3/4 cup sugar (to your liking) (I tend toward 1/2 cup, but most will choose more. My daughter uses honey.)
  • 1 pinch salt (optional–I use it because I look cool tossing a pinch of salt into a beverage)
  • 1/3 cup water
  • 3 cups milk (any kind–we use whole, coconut, or almond)
  • 1 cup cream or half-n-half (or an extra cup of milk)
  • 1 teaspoon vanilla (optional)

Optional add-ins:

  • whipped cream
  • chocolate chips of any variety
  • cinnamon or cinnamon sticks
  • marshmallows
  • peppermint sticks or candy canes
  • coffee or espresso
  • peanut butter

Directions:

  1. Mix all dry ingredients together.
  2. Boil the water in a heavy saucepan.
  3. Dissolve the dry ingredients in the boiling water by whisking over medium heat for about two minutes–keep it to a simmer.
  4. Add the milk and heat it until it’s hot, whisking continually. Do not boil. Pay close attention, because milk burns faster than I lose my train of thought.
  5. Remove the deliciousness from the heat.
  6. Add the cream or half-n-half and the vanilla.
  7. Divide the sweet deliciousness between four mugs, unless your cocoa drinkers are little, in which case it might stretch into six or eight, especially if you fill half a mug with marshmallows.
  8. Add more cream to cool if needed…or just wait.

I know you’re asking “Why water? Can’t I just boil the milk? Can’t I just stir the powders into the milk? Can’t I just use the packets from Swiss Miss?”

Because a very hot liquid will dissolve the sugar. No, because it might curdle or burn. Yes, but it might be a little gritty. If you like Swiss Miss, drink Swiss Miss–it’s certainly easier, and you just can’t argue with tiny little marshmallows with their tiny marshmallow cuteness.

Related Recipes:

  • This Tres Leche Cocoa looks fantabulous! Oh, yummity yum yum yum!
  • Allergic to dairy? How about this oh-so-scrumptious Almond Hot Cocoa!
  • If you’re allergic to dairy and nuts, here’s a recipe for Coconut Milk Hot Chocolate. It is sweetened with honey, but you can use the sweetener of your choice, because America is great like that.
  • If you’re not allergic to anything or you’re allergic to everything and you want to die in complete bliss, you have to try this Whipped Hot Chocolate recipe.

Homeschool Helps:

For your science studies, answer the ever-fascinating question, “Where does chocolate come from?

For your home economics class, learn this relevant skill which I hope you don’t need today: How to remove burned milk from a saucepan.

Here’s the boring printable version.

Homemade Hot Cocoa Recipe
Recipe Type: Beverage
Author: Christy, The Simple Homemaker
Prep time:
Total time:
Serves: 4 cups
This basic recipe can be adjusted to fit anybody’s needs or preferences. Don’t be afraid to experiment..a lot.
Ingredients
  • Main ingredients:
  • 1/3 cup cocoa powder
  • 1/3 to 3/4 cup sugar or other sweetener (to your liking)
  • 1 pinch salt (optional)
  • 1/3 cup water
  • 3 cups milk (any kind–we use whole, coconut, or almond)
  • 1 cup cream or half-n-half (or an extra cup of milk)
  • 1 teaspoon vanilla (optional)
  • Optional add-ins:
  • whipped cream
  • chocolate chips of any variety
  • cinnamon or cinnamon sticks
  • marshmallows
  • peppermint sticks or candy canes
  • coffee or espresso
  • peanut butter
Instructions
  1. Mix all dry ingredients together.
  2. Boil the water in a heavy saucepan.
  3. Dissolve the dry ingredients in the boiling water by whisking over medium heat for about two minutes–keep it to a simmer.
  4. Add the milk and heat it until it’s hot, whisking continually. Do not boil. Pay close attention, because milk burns faster than I lose my train of thought.
  5. Remove the deliciousness from the heat.
  6. Add the cream or half-n-half and the vanilla.
  7. Divide the sweet deliciousness between four mugs, unless your cocoa drinkers are little, in which case it might stretch into six or eight, especially if you fill half a mug with marshmallows.
  8. Add more cream to cool if needed…or just wait.


Very Simple Rhubarb Pie Recipe

This delicious rhubarb pie recipe is not the healthiest item on the menu, but it sure is one of the tastiest, and hey, it’s a vegetable! It’s simple, it’s pie…what’s not to love?


It’s rhubarb season! If you’ve got this “weedible” (edible weed) growing like crazy in your yard, I’ve got a deeelicious recipe for you.

Simple Rhubarb Pie Recipe from TheSimpleHomemaker.com

This rhubarb pie recipe uses white sugar and white flour, two things that rarely make an appearance in my kitchen. But hey, it’s got rhubarb in it, and rhubarb is a vegetable, so…there ya go.

Before we proceed, you are aware, are you not, that the leaves of rhubarb are poisonous. Just use the stalks. Pretend you knew that, if you didn’t.

The original recipe is from All Recipes. Ours is only ever-so-slightly different.

Simple Rhubarb Pie Recipe from TheSimpleHomemaker.com

Simple Rhubarb Pie Recipe

Ingredients

  • 4 (hefty) cups fresh rhubarb, cut into 1/4-1 inch pieces
  • 1 1/3 cups sugar (scant)
  • 6 tablespoons flour
  • 2 tablespoons butter
  • 1 double pie crust

Directions

  1. Position the bottom crust in the pie pan
  2. Combine sugar and flour in a small bowl. (They get along well, so this is simple.)
  3. Sprinkle a layer of flour/sugar in the bottom crust.
  4. Pile the rhubarb in the crust.
  5. Sprinkle the rest of the flour/sugar over the top.
  6. Cut the butter into little pieces and place them on the rhubarb.
  7. Add the top crust. Crimp.
  8. Bake at 450 for 15 minutes on the bottom rack.
  9. Lower the temperature to 350 and bake another 35-45 minutes, depending on your oven.

Tips

Cut your rhubarb the size you prefer. I like mine “mushy” and small, but others prefer rhubarb slightly firmer and a little bigger. Your call!

Serve warm or cold with ice cream or without. Call it a veggie and serve in place of dinner or breakfast.

A regular pie pan is sufficient; do not use a deep-dish.

If the crust starts browning too quickly, wrap aluminum foil around the edges.

Place a cookie sheet directly under the pie pan in the oven to catch any drips. If you forget to do this, be sure to offer the firemen a nice warm slice of fresh rhubarb pie.

If you’re on a diet (ugh) or a “plan,” this probably doesn’t fit perfectly…or at all…so just pin it for after you’ve fallen off the wagon your free days. Hey, I’m on a plan, but I’m a realist, so I’ve got your back. Wink.

Simple Rhubarb Pie Recipe from TheSimpleHomemaker.com


Reviews

A picky husband: My mouth really likes it, but my eyes can’t get past the fact that it looks like celery pie. (Our rhubarb was mostly green, not red.)

A teen: This pie is a success!

A four-year-old: I ate all the ice cream.

The Simple Homemaker: I can’t eat dairy or sugar, but snuck a sliver of this pie anyway, and oh my! Fantabulous!

Here’s the boring printable version:

Simple Rhubarb Pie Recipe

Recipe Type: Dessert
Author: The Simple Homemaker
Prep time:
Cook time:
Total time:
Serves: Me
A simple pie that sweetens the tang of rhubarb for a delicious dessert.
Ingredients
  • 4 (hefty) cups fresh rhubarb, cut into 1/4-1 inch pieces
  • 1 1/3 cups sugar (scant)
  • 6 tablespoons flour
  • 2 tablespoons butter
  • 1 double pie crust
Instructions
  1. Position the bottom crust in the pie pan
  2. Combine sugar and flour in a small bowl.
  3. Sprinkle a layer of flour/sugar in the bottom crust.
  4. Pile the rhubarb in the crust.
  5. Sprinkle the rest of the flour/sugar over the top.
  6. Cut the butter into little pieces and place them on the rhubarb.
  7. Add the top crust. Crimp.
  8. Bake at 450 for 15 minutes on the bottom rack with a cookie sheet under the pie pan to catch drips.
  9. Lower the temperature to 350 and bake another 35-45 minutes, depending on your oven. Cover the edges with aluminum foil if it gets dark too quickly.
  10. Serve warm or cold.

A great big thank you goes out to Lynn from Jackson, Wisconsin, for supplying us with rhubarb (and a rhubarb coffee cake)!

Let me know if you try this simple rhubarb pie recipe, and feel free to share your favorite rhubarb recipes here!


Smart Sweets Ebook Review

Ever since I delivered baby number seven, I’ve been craving j-u-n-k, JUNK!  I’m talking “bake me a batch of cookies so I can eat them ALL.”  I’m talking “give me a handful of corn dogs with non-organic, nitrate-laden dogs inside and corn syrup-saturated ketchup on the outside.”  I’m talking “break out that chocolate we bought LAST Christmas.”

Smart Sweets Giveaway

We don’t have corndogs, and chocolate does not agree with me (although I totally agree with chocolate), so that left me with eating a batch of cookies all by myself.  I was up for that.

But my baby was not.  As a nursing mother, I try to maintain the same diligence in monitoring what goes into my body after the baby is born as I did before.  That means gobs of sugar are o-u-t, out. But it doesn’t mean the fun foods have to be o-u-t, out.

Smart Sweets to the rescue!

Smart Sweets: 30 Desserts to Indulge Your Sweet Tooth is a real foods dessert cookbook written by Katie Kimball of Kitchen Stewardship.

Smart-Sweets-book-cover_thumbI loved this book even before I tried any of the recipes.  Here’s why:

Information: Katie summarizes real food dessert baking exceptionally well.  She is very open about how healthy (or unhealthy) desserts are, how “smart” each of the different sweeteners are, and what your basic ingredient options are on the road to eating smarter sweets.

Adaptability: Are you gluten-intolerant, dairy-sensitive, or allergic to eggs?  You can still use this book.  Is the only sweetener you have in the house the plain ol’ white stuff?  Your dessert won’t be quite as “smart,” but you can use it.  Each recipe contains tips, alternatives, and frequently asked questions so you can adapt the recipe or baking process to suit your needs or tastes, gradually moving toward more natural sweeteners as your taste buds adapt.  Adaptability is awesome!

honeySymbols: Katie includes symbols to easily and quickly indicate allergen alerts as well as how “real,” expensive, and time-consuming each recipe is.  When you need cookies now…like totally now…the time symbol is crucial.

Ingredients: You can find these ingredients. They’re real, normal ingredients! I am elated!  In fact, most of them are right here in my pantry, and probably in yours as well.  And if they’re not, she offers many alternatives as well as advice on where to find them.

Attitude: Nowhere in the entire book does Katie give you the impression that you need to attain a certain level of “smartness” to feel good about how you feed your family.  She offers a gentle guide to making indulgent food better for you, but gives you options for wherever you are in your journey.  I love that about her.

But what about the recipes?

The recipes assuaged my cravings beautifully, and the family was happy, too.  Here are some quotes from the mouths of my children after eating desserts from Smart Sweets:

“These are fantastic!”

“May I have more…please?”

“I love these. Make them again!”

“This is a great flavor combination.”

“Don’t bother baking them. Let’s just eat the dough.”

cookie_cartoonOne anonymous person who is not a honey fan did not care for the honey flavor in the honey-molasses cookies that the rest of us loved…and then that anonymous person ate the rest of the batch after the family went to bed.  That anonymous person’s words were thereby negated by that anonymous person’s action.

We did have a texture-related incident with a pudding recipe involving arrowroot and forgetting to stir, in which case the words “worms” and “boogers” showed up, but that was the fault of the distracted stirrer (the crazy craver mentioned earlier), and not the recipe.  The flavor itself was great, and it was eaten up…boogers and all.  Had I stirred, all would have been well.

Enough talk!  Do you want to try a recipe from Smart Sweets?  Of course you do!

Download this free recipe for Apple Crisp.

Enough baking! Do you want to win a copy of the ebook Smart Sweets? Of course you do!

Giveaway Closed

Win a Copy of Smart Sweets

To enter, do any or all of the following, and leave a separate comment for each entry:

TN_9-12-07_50cSign up for my newsletter.  Leave a comment that you did so.  If you are already a subscriber, leave a comment saying so, and you will be entered.


TN_11-12-07_27cCheck out the Smart Sweets table of contents.  Come back here and leave a comment about a recipe or anything else that catches your eye. (Did you notice the bonus recipe?)

TN_9-12-07_48cShare this giveaway on Facebook, Twitter or both, and leave a comment for each share. (Feel free to like The Simple Homemaker or follow TheSimpleHome while you’re sharing, although they won’t earn you an entry.)

TN_11-12-07_26gBake the apple crisp and bring it to my house. On second thought, that probably borders on bribery.  Best skip that entry.


If you would rather not wait, you can buy your own copy, download it instantly, and use it today to bake Christmas goodies. The Simple Homemaker readers can use code SIMPLE25 to get a 25% discount on Smart Sweets until December 26.  (It pays to be a TSHM reader!) If you then win the free book, Katie will refund your purchase. (Isn’t she great?!)

Buy Smart Sweets

Happy (and smart) eating! I’m off to make the classic butter cake and eat more pumpkin cookies, all in the name of doing a thorough review!  It’s a tough job.

TSHM disclosure statement: Katie gave me a free review copy of Smart Sweets. (Thanks, Katie!)  That in no way influenced my review or opinion of the book.  (If it had, would I have mentioned the boogers?) In fact, I’m going to buy one of her other books, Healthy Snacks To Go, based both on how much I like this book and also on the Healthy Snacks To Go table of contents and reviews.  The links in this post are my affiliate links. If you purchase a book from Katie through one of my links, I will receive a small commission.  I will not buy corn dogs with it.

Giveaway legaleze: This giveaway is for one ebook (not a hard copy book), which will be available for download.  The giveaway ends Friday, December 16, 2011 at 11:59 p.m. PST.  It is open to anyone over age 13 the world over.  This giveaway is in no way affiliated with Facebook or Twitter.  The winner will be chosen at random and will be notified by email and on this blog.  The winner will have 72 hours to respond or another winner will be chosen…sorry!