Why I Don’t Post More Often (I Blame Peter)

Peter Post Pinnable

I have a confession to make. Sometimes I miss blog post deadlines. In fact, I’m “supposed” to be posting twice a week, and sometimes I only post twice a month. Oops.

I just missed a deadline. I blame Peter.

You see, Peter was madly in love with Lucy. He loved her so much that he promised to change his name to Jack if she would marry him. True story. So Lucy said yes and Peter-Jack was happy, but Lucy needed a dress.

So I made her one.

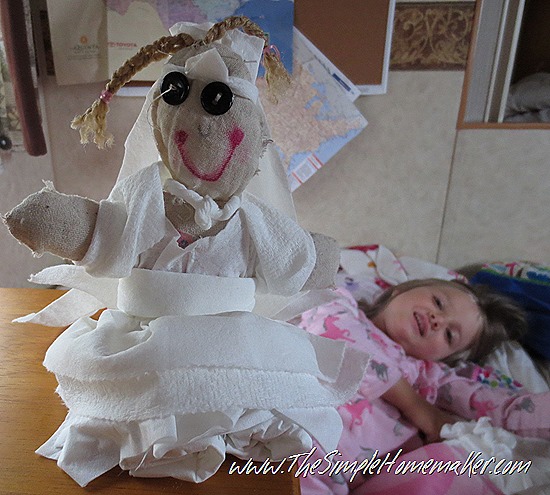
It took me all morning to make Lucy a wedding dress with a poofy skirt and poofy sleeves and a veil that went all the way to the floor and a princess crown and a necklace, all out of paper towel, scotch tape, and tissues.

Then Peter-Jack got cold feet, and hid in the van under a blanket with the figs and extra undies. Lucy was devastated, so I hunted down Peter-Jack and reminded him of all the things he loves best about Lucy—her floppy neck, her button eyes, her permanent marker smile, how her insides leak out of her right foot, and the two boingy braids popping right out of the top of her head. She’s a vision.

Peter was smitten once again. Can you blame him?

IMG_5256

Peter-Jack and Lucy were married in a quiet ceremony in our travel trailer. It was beautiful. Then they had a lot of babies, in, like, five minutes. In fact, I’m babysitting right now. (Not to make you jealous, but Lucy fit into her wedding dress seconds after those babies were born.)

Sometimes it’s Peter-Jack and Lucy that keep me from blogging. Sometimes it’s a loose tooth or a sliver. Sometimes it’s the words “One more chapter, Mama!” or “I need a snuggle.” Sometimes it’s a phone call from Grandma. Sometimes it’s “Babydoll, what do you think about…?” (Yup, my man calls me Babydoll.)

I blog about simplifying. I preach making life less complicated and finding joy in the simple things.

The simple things:

The laughter of a child. The chatting of a teen. The comfortable closeness of a husband. The fleeting wonder of a baby. Eye contact. The discovery of a butterfly or a new-to-us bird. Playing games. Collecting flowers, shells, rocks, memories. Listening to dreams. Planning futures. Telling stories. Sharing memories. Walking dogs. Connecting across miles and generations. Making wedding dresses out of scotch tape and paper towels. Four-year-old wedding singers in pink pajamas.

IMG_5281

Those are the simple things I’m not willing to miss.

I’m not willing to put my kids in daycare or preschool, give up homeschooling, jeopardize our Christian music mission, or hire someone else to take on my God-given role as mother to these children just so I can write about my simple biscuit recipes or how to make baking powder or even the value of a homemaker. I’m not willing to pay someone else to do my job so I can make a little more money online. I’m not willing to take time away from my children so I can write posts encouraging other parents to spend time with their children. It’s a sacrifice I am not willing to make.

I’m not willing to stress myself out, stress my family out, or make every day and every family activity revolve around a blog post or deadline.

And if my blog suffers for it, okay. If it doesn’t flourish, okay. If it doesn’t grow as fast as the other blogs, okay. That’s a sacrifice I can live with.

But missing out on the simple, precious moments with my family, losing minutes, days, years with my loved ones, not being fully there for them, that’s a sacrifice I cannot, I will not make. I will not sacrifice my family on the altar of anything this world has to offer.

I’ve been there, and I can’t go back. That lifestyle’s parenting mantra is “in a minute,” and its reward is regret as those minutes turn to years and the moment is gone forever.

IMG_5378

So if you notice from time to time that you are not hearing from me, that my Facebook page is quiet and my Twitter is tweetless, that I haven’t been pinning and that there hasn’t been a new post in a while, understand that my silence is shouting this:

“Nothing is worth more than these few, precious, fleeting moments with the people you love. Don’t sacrifice that…ever.”

I have to run. I hear Lucy and Peter-Jack had another set of quintuplets and they need a babysitter. I’m their girl!

I’d love to hear your thoughts.

Simple Tools for a Simple Home – The Garlic Press

My husband gave me this website as a Christmas gift nearly two and a half years ago. He has been nagging encouraging me ever since to share with all of you the simple tools I use to help me efficiently manage my homeschooled family of nine and run my simple home, in particular my simple kitchen.

Simple Tools for a Simple Home - The Garlic Press

It took an invitation from Erin of The Humbled Homemaker to get me started on my husband’s two-year-old request. (Sorry, Babe.) With Erin’s little kick in the pants and an eye-roll from my hubby (I didn’t see it, but I totally felt it), I’m finally following his advice. Each month I will introduce you to one of the tools I use to keep it simple, improve efficiency, keep the family fed primarily from scratch (no boxes in The Simple Kitchen), and still preserve the almost non-existent counter space we have in our dinky cozy travel trailer.

Are these tools necessities? Well, essentially all I need in life is food, water, and my Savior (although you would probably all prefer I keep a layer or two of clothing between the skin God gave me and the outside world), so no. But these are tools I rely on heavily to get the job done right. They made the cut during The Great Purge when we packed up our house for good and took the Christian music mission on the road full time. (But that’s a story for another blog.)

At The Humbled Homemaker I introduce you to one of those quasi-essential tools, my beloved garlic press.

Simple Tools for a Simple Home - The Garlic Press

My garlic press has made cameo appearances here at The Simple Homemaker, such as in my amazing (but humble) garlic butter recipe and my homemade Italian salad dressing recipe. I use it for eggs, soups, crockpot dishes, wet rubs…you name it! When I’m lazy I press instead of slice garlic for recipes like chicken adobo. We buy masses of fresh garlic and use it in as many dishes as possible during cold and flu season, ‘cuz who wants a trailer full of pukers with no access to a washing machine. Not me, I tell ya! Not me. Shudder.

Simple Tools for a Simple Home - The Garlic Press

Learn all about my garlic press and read questions from real readers (and real answers from real me) to decide whether or not a real garlic press would benefit the real you. It’s all part of The Humbled Homemaker’s terrific weekly series featuring an array of guest writers chatting up their favorite kitchen tools.

Simple Tools for a Simple Home - The Garlic Press

Don’t miss an episode! Sign up for The Humbled Homemaker’s email updates for her weekly tool of the trade, and sign up for my updates to learn which lucky tools travel the country with us. Then take a nap, cuz that’s typing your name and email address, like, twice. Whew!

Find out if you would benefit from a garlic press. Click here. Come on, everybody’s doing it.

How to Make (amazing) Garlic Butter

How to Make Amazing Garlic Butter | TheSimpleHomemaker.com

This garlic butter is amazing. It’s amazing! It’s so amazing that when I make it and sit down to dinner with my family, I can’t stop talking about it. I can’t stop saying in my amazed voice, “This is amazing!”

And they can’t stop saying in their sarcastic voices, “Wow, you’re humble.”

And that’s why, at The Simple Home, we call this “Mommy’s Humble Garlic Butter.” You, however, may simply call it Amazing Garlic Butter.

The original version can be found at AllRecipes.com. The recipes are both very tweakable, so do what you like to make it work for your family, cuz that’s what cooking for the family is all about, isn’t it?

How to Make Garlic Butter

How to Make Amazing Garlic Butter | TheSimpleHomemaker.com

Ingredients:

  • 1 stick butter, softened
  • 5-ish shakes paprika
  • 2-6 cloves minced fresh garlic
  • 1/2 teaspoon salt
  • 1 teaspoon Italian seasoning

Optional ingredients:

  • 2 teaspoons garlic powder (intensify the garlic flavor with garlic powder, or replace the fresh garlic entirely)
  • 1/4 cup parmesan cheese (we like it with or without)

Directions:

1. Make sure your butter is nice and soft.

How to Make Amazing Garlic Butter | TheSimpleHomemaker.com

2. Add 4-6 shakes of paprika, or more for a deeper orange color. (If you’re four, you may wish to go with four, because four is fun.)

How to Make Amazing Garlic Butter | TheSimpleHomemaker.com

3. Add as much fresh minced garlic as you like, 1-2 cloves for a light garlic flavor, 6 for a stronger flavor. We used 6 in this batch. (See notes for more info on garlic.)

How to Make Amazing Garlic Butter | TheSimpleHomemaker.com

4. Add 1/2 teaspoon of salt. I like salt, and because I eat pretty much everything from scratch, it isn’t hiding in many of my foods. That’s why I don’t have an issue with a heaping half teaspoon. Adjust to your needs and tastes, but remember that salted butter varies in its salt content, so start low and add more if needed.

How to Make Amazing Garlic Butter | TheSimpleHomemaker.com

5. Add a teaspoon of the Italian seasoning of your choice. We usually use homemade, but for this batch we used these gorgeous Penzey’s Italian herbs gifted to us from a friend we met on our travels.

How to Make Amazing Garlic Butter | TheSimpleHomemaker.com

6. Mix with a spoon (or I suppose you could use some form of technology if you are desperate to wash something).

How to Make Amazing Garlic Butter | TheSimpleHomemaker.com

7. Taste. Adjust to your desired level of amazingness.

How to Make Amazing Garlic Butter | TheSimpleHomemaker.com

8. Serve. (See ideas below.)

How to Make Amazing Garlic Butter | TheSimpleHomemaker.com

Store your humbly amazing garlic butter in the refrigerator and use within a couple of days if you are using fresh garlic. If you are using garlic powder, store where you normally keep your butter.

Serving Ideas:

  • Spread it on warm fresh bread or biscuits and serve immediately.
  • Spread it on bread, wrap the bread in foil, and return it to the oven. Oh my! (Yeah, I know foil will kill you, but who really cares. I mean, this is amazing! I just drooled on my keyboard. Not joking.)
  • Saute mushrooms and onions in garlic butter for an easy side.
  • Use it to scramble eggs, fry eggs, or flavor cooked eggs. (It’s great for these flower or shamrock eggs.)
  • Spread it on a toasted hamburger bun for a garlicky butter burger.
  • Add it to a grilled steak. I hear angels!
  • Melt it and add it to any vegetables. Do it. I triple dog dare ya.
  • Spruce up a boring side dish of plain noodles, rice, quinoa, or other grains.
  • Adorn baked potatoes or use it to flavor mashed taters.
  • Melt it and pour it over popcorn. Oh yeah!
  • Stick it in a bowl, set it on the supper table, and watch what happens.
  • It’s so versatile, you could even wear it. Okay, maybe not.

How to Make Amazing Garlic Butter | TheSimpleHomemaker.com

Notes:

Adjust the garlic to your liking. We like garlic…I mean I personally seriously love garlic. Don’t stand right next to me. Garlic breath. Whew.

Test it with garlic powder instead of fresh garlic sometime to see how you prefer it. I like to tone down or replace the fresh garlic if I’m serving it raw, but if I’m using it to cook or on bread that’s going in the oven, I hit it hard with fresh garlic. Bam!

I almost always double this recipe, because it’s amazing. I may have mentioned that.

How to Make Amazing Garlic Butter | TheSimpleHomemaker.com

Here’s the boring printable version:

How to Make (amazing) Garlic Butter

Recipe Type: condiment
Author: Christy, The Simple Homemaker
Prep time:
Total time:
This delicious, quick, and simple garlic butter is versatile and amazing in any of its many uses.
Ingredients
  • 1 stick butter, softened
  • 5-ish shakes paprika
  • 2-6 cloves minced fresh garlic
  • 1/2 teaspoon salt
  • 1 teaspoon Italian seasoning
  • 2 teaspoons garlic powder (optional: intensify the garlic flavor with garlic powder, or replace the fresh garlic entirely)
  • 1/4 cup parmesan cheese (optional)
Instructions
  1. Measure.
  2. Combine by hand.
  3. Taste and adjust the garlic as desired, using either fresh or powdered garlic.
  4. Serve as a spread for bread and biscuits, as a flavor enhancer for sides, or on popcorn. Put on meat or use to cook eggs and veggies.
  5. Store in the refrigerator and use within a couple of days if you are using fresh garlic. If you are using garlic powder, store where you normally keep your butter.


Seriously, I think this is amazing…but I love butter, and I love garlic, so…there ya go.

That’s how to make garlic butter. Make it, eat it, let me know what you think!

Special thanks to my daughter Hannah of Horse Crazy Bookworm for many of the photographs, and to my  helpers, butter softness tester, and tasters. You are all that and more!


Wondermill Grain Mill Giveaway Worth $260

It’s kitchen month at The Simple Homemaker. We’ll be talking about simplifying our meals, our kitchen time, and our “necessities.” I’ll share recipes, tips, and some favorite kitchen tools.

To kick it off, I am super-excited to have joined a number of other bloggers for a giveaway of a kitchen tool which, ironically, I no longer have in my kitchen now that we’re on the road. But, hey, who cares! It’s a fantastic giveaway for a Wondermill Grain Mill worth $260.


Now you’re asking why on earth you would want a grain mill.

Long story short, with a grain mill, you can bulk order wheat, oats, rice, kamut, barley, spelt, quinoa, whatever, and grind it to use as fresh flour. (To learn more, watch the video below.)

Now you’re asking why on earth you would want to do that.

And this is when I say, hey, if you don’t want a grain mill, don’t sign up for the giveaway!

Seriously, though, friends, fresh ground flour is delicious and nutritious, and gives many alternatives over wheat if you are sensitive to gluten or want to vary your options. And, believe it or not, it is ultra-simple! Plus there’s no comparison to baking your own bread, and I personally love the flavor and texture from freshly ground wheat or oats in biscuits, cornmeal, or “oatcakes.”

But…

…and that’s a big but, if that nagging little voice inside of you is screaming at you that you just can’t handle one more thing or you’re just not ready to grind your own grains or you just don’t think you ever will be ready to grind your own grains or you couldn’t care less about grinding your own grains or you’re wondering if maybe it will work on Barbie dolls to make pixie dust, please just click away. That’s okay!

If, however, you are interested in a Wondermill Grain Mill, this is a terrific opportunity provided by the Positively Real Media Network (a blog network focused on real faith, real family, real food).

Win a Wondermill Grain Mill worth $260

From what I’ve researched, the Wondermill is the world’s top-rated electric grain mill. (I cannot speak from personal experience, because back when we were stationary I used the Kitchen Aid stand mixer grinder attachment. Still, I would like to speak from personal experience!)

Movie time!

The video below will teach you all about this little wonder, aptly named the Wondermill…and if you’re a homeschooler, your kids can watch, too, and call it school. Yee haa!

I know…I totally want one, too.

Enter the giveaway via the Rafflecopter below. The mandatory entry is super simple – just hit “Enter.” Then you can earn additional entries for following your favorite blogs via Facebook. Increase your chances by liking them all.

This giveaway is available throughout the United States and Canada, but that’s all. Sorry to all my friends elsewhere.

Click here:

a Rafflecopter giveaway

(If you win, and you don’t want it, you have my address, right?)

All-Purpose Seasoning Recipe for Chicken, Fish, Rice, Veggies, and Just About Anything Else

Sometimes I’m all about speed and efficiency in the kitchen. That’s why I like to mix up my own spice blends ahead of time. On a busy night, there’s nothing better than a handy spice mix that you can snag for just about anything. (You all know that when I say “there’s nothing better,” I’m not counting cookies and pie and salvation and family, right? Just so we’re on the same page.)

That’s why I love this all-purpose seasoning we’ve made for years and named Mama’s All-Purpose Seasoning for Chicken, Fish, Rice, Veggies, and Just About Anything Else, or Mama’s APSFCFRVAJAAE. Catchy, eh? Fine, let’s just call it APS. Happy? Good.

The Simple Homemaker's All-Purpose Seasoning Recipe for Chicken, Fish, Rice, Veggies, and Just About Anything Else

I use APS on my roasted chicken, baked fish, pan fried fish, pan-fried chicken, veggies, and plain rice or quinoa. I’ve used it with flour to make a breading. Sometimes I sprinkle it on baked taters or home fries. APS is versatile enough to be used with just about anything. The only thing I haven’t used it for yet is dessert, although it might be good on popcorn. Hmmmm.

The original recipe comes from AllRecipes.com. My version is simplified, because that’s what I do...just in case you haven’t noticed by now.

As with all recipes, adjust the seasonings to your tastes and totally make it your own.

All-Purpose Seasoning for Chicken, Fish, Rice, Veggies, and Just About Everything Else

Ingredients

  • 4 teaspoons salt (start at 2 and adjust up (or down) according to your tastes)
  • 1 teaspoon onion powder
  • a scant teaspoon pepper (adjust according to your peppery mood; sometimes I use 1/2)
  • 1 heaping huge teaspoon garlic powder (or 2)
  • 2 teaspoons paprika

Optional ingredients

  • 1/4 teaspoon cayenne pepper (adjust as desired)
  • 1/2 – 1 teaspoon thyme (I like to use this for roast meats and sometimes for other cooked dishes, but I leave it out when I make a big batch to have on hand for general sprinkling)

Instructions

1 – Measure.

The Simple Homemaker's All-Purpose Seasoning Recipe for Chicken, Fish, Rice, Veggies, and Just About Anything Else

2 – Mix.

The Simple Homemaker's All-Purpose Seasoning Recipe for Chicken, Fish, Rice, Veggies, and Just About Anything Else

3 – Taste and adjust to your liking.

The Simple Homemaker's All-Purpose Seasoning Recipe for Chicken, Fish, Rice, Veggies, and Just About Anything Else

4 – Store APS in an empty spice container or in a mason jar in your pantry.

Cooking with APS

What to do with it:

Sprinkle APS wherever you want…within reason. (I don’t think I’d like it on ice cream.) I usually put it on potatoes and meats before cooking, and grains and veggies after cooking…but that’s just me. My hubby sprinkles it on anything as a table seasoning, especially rice.

How much to use:

About 2-3 teaspoons seasons a roasted chicken before cooking. If you add the additional ingredients (cayenne and thyme) or use extra pepper, it will be closer to two. Otherwise, just sprinkle lightly as with any salt.

The Simple Homemaker's All-Purpose Seasoning Recipe for Chicken, Fish, Rice, Veggies, and Just About Anything Else

This chicken was thinly sliced, tossed in a pan with olive oil, and sprinkled lightly with APS–that’s it! It was fantastic. All the best pieces were eaten before I remembered my camera, but these leftovers don’t look too bad! I call dibs!

The Simple Homemaker's All-Purpose Seasoning Recipe for Chicken, Fish, Rice, Veggies, and Just About Anything Else

Notes and hints:

We make this in bulk so it’s on hand to sprinkle on my roast chicken or anything else we feel needs a little more flavor. The simplest way to make it in bulk is to change the teaspoons to tablespoons, or just do a little math and multiply by, say, 20. It’s good for the ol’ noggin. Don’t mix it up in bulk until you’ve tried the recipe and tweaked it to your liking.

Sometimes we add thyme, but not usually when we make it in bulk, because I don’t want it in the big container for sprinkling on already cooked food. I really like the thyme for potato dishes and roast chicken, but I leave it out when I’m in a thyme-less mood.

The Simple Homemaker's All-Purpose Seasoning Recipe for Chicken, Fish, Rice, Veggies, and Just About Anything Else

We like salt. Adjust the salt to your personal preferences. When you’re making it, start with half the amount of salt and adjust up (or down if you’re really a low-salter). Some salts (like our Redmond’s Real Salt) taste more or less salty than others (like the Morton’s sea salt my chef used this time), so keep that in mind when adding salt. You can always add more.

The Simple Homemaker's All-Purpose Seasoning Recipe for Chicken, Fish, Rice, Veggies, and Just About Anything Else

The same goes for the pepper, garlic, and cayenne. Go with your mood, or find something that works for your family. We tend to enjoy a little extra heap to our garlic, but I generally save the cayenne for my cajun spice mix.

The Simple Homemaker's All-Purpose Seasoning Recipe for Chicken, Fish, Rice, Veggies, and Just About Anything Else

Once you get it adjusted to your liking, write the recipe down on a piece of paper and attach it to the container you store it in, so you can easily replenish as needed.

Here’s the boring printable version:

All-Purpose Seasoning Recipe for Chicken, Fish, Rice, Veggies, and Just About Anything Else

Author: Christy, The Simple Homemaker
Prep time:
Total time:
An all-purpose seasoning for just about anything in your kitchen.
Ingredients
  • 4 teaspoons salt (start at 2 and adjust up (or down) according to your tastes)
  • 1 teaspoon onion powder
  • 1 scant teaspoon pepper (adjust according to your peppery mood; sometimes I use 1/2)
  • 1 heaping huge teaspoon garlic powder (or 2)
  • 2 teaspoons paprika
  • 1/4 teaspoon cayenne pepper – optional (adjust as desired)
  • 1/2 – 1 teaspoon thyme – optional (I like to use this for roast meats and sometimes for other dishes, but I leave it out when I make a big batch to have on hand for general sprinkling)
Instructions
  1. Measure, combine, and store in a spice container or mason jar in the pantry.
  2. Sprinkle on your food as desired, either before or after cooking. I like to sprinkle it on meat and potatoes before cooking, and grains and veggies after.
  3. Adjust the seasonings to your personal preferences. For example, start with half the salt and adjust up if you like food to be less salty.


So, I suppose, like my hubby, you’re wondering why this is better than Lawry’s (or any other brand of) season-all salt. Mine has a cooler acronym.


Let me know how you adjust APS to your family’s liking…and what you call your version!  I’d love to hear.


Homemade Salad Dressing Recipe – Italian Dressing

I haven’t purchased salad dressing in years. Why not? We make it ourselves.

Homemade salad dressing is the way to go, people! You can adjust the flavors to your liking, avoid any allergens or additives, control the sweetness, save money, and procrastinate just a little bit longer on that trip to the store. Best of all, it’s simple and delicious!

Homemade Salad Dressing Recipe - Italian Dressing | The Simple Homemaker

We have a variety of homemade salad dressing recipes, including the classics, such as ranch, Caesar, and French, and a few more creative options. Today’s salad dressing recipe is our quick go-to Italian dressing that we throw together as needed or to keep on hand for a quick lunch salad or dinner side.

To create this recipe, we took an existing recipe from Pampered Chef and altered it considerably over the years to fit our tastes and preferences. This recipe allows for numerous variations, so don’t be afraid to experiment to find what suits your family best.

Homemade Salad Dressing – Italian Dressing Recipe

Ingredients

Homemade Salad Dressing Recipe - Italian Dressing | The Simple Homemaker

  • 1/2 cup white wine vinegar
  • 1 cup extra virgin olive oil
  • *1 tsp basil
  • *1/4 tsp oregano (missing in the photo…and this batch)
  • *3-6 cloves minced garlic (may substitute 1/2-1 teaspoon garlic powder)
  • *1/2-1 tsp salt (start with less and add more if desired)
  • 1/2 tsp onion powder

*(You could replace all of these with 2-3 teaspoons of Italian seasoning, but because each Italian seasoning recipe varies, you can adjust the dressing more to your personal liking by using separate seasonings.)

Combine all the ingredients in a container and shake or stir to combine.

Notes and Tips:

We usually whip up and serve our Italian dressing in a Pampered Chef “Measure Mix and Pour” salad dressing container that I bought a decade ago. It’s so simple, a four-year-old can use it. See!

Homemade Salad Dressing Recipe - Italian Dressing | The Simple Homemaker

Amazon also has dressing mixers, such as this one, that look like they work in a similar manner. I also like the cruets that you fill, close, and shake, like this one.

Another option for shaking and serving is to toss all the ingredients in a wine vinegar bottle, shake it up, and serve it from the bottle. It’s the free option.

One of the perks to making your own salad dressing is eliminating unwanted ingredients, such as sugar. We don’t put sugar in our homemade dressing, but if you want to take the edge off the vinegar or sweeten the oil, add sugar or the sweetener of your choice in 1/4 teaspoon increments (less if using stevia) until it reaches your preferred sweetness. Taste as you go.

Homemade Salad Dressing Recipe - Italian Dressing | The Simple Homemaker

We like a 1:2 vinegar to oil ratio, but if you prefer less vinegar, experiment to find the ratio you like best. Sometimes I’m only in the mood for a 1:3 ratio, and use 1/3 cup vinegar. The same applies to the garlic…and all the other ingredients. Alter them to suit your tastes.

During cold and flu season, add extra garlic for a little immune blast! This batch had 6 cloves, but we normally use 4.

Homemade Salad Dressing Recipe - Italian Dressing | The Simple Homemaker

If the olive oil flavor is too strong for you, swap out half the extra virgin olive oil for another healthy oil, such as grapeseed oil (commonly available in most grocery stores) or avocado oil.

Shake before using, as the dressing will separate. Or find someone cute and little to shake or stir for you.

Homemade Salad Dressing Recipe - Italian Dressing | The Simple Homemaker

Store your dressing in the refrigerator and use it within a few days. I do not know the science behind this, but I generally don’t let it go past two weeks. If you have a small family or don’t eat salads often, cut the recipe in half or quarters if using fresh garlic.

Storing it in the frig will cause the oil to solidify, so plan ahead and set it out for thirty minutes, or run it under hot water for a couple minutes. Sometimes I cheat and leave it out, but you didn’t hear that from me.

Caution: fresh garlic stored in oil can result in botulism, so, regardless of what I do, store yours in the refrigerator and use within a few days if using fresh garlic. Still, vinegar is used as a preservative for garlic, so…there’s that. Use your common sense and don’t mix up enough to last an age unless you use garlic powder instead of fresh garlic.

Enjoy!

Homemade Salad Dressing Recipe - Italian Dressing | The Simple Homemaker

Here’s the printable version:

Italian Salad Dressing

Author: Christy, The Simple Homemaker
Prep time:
Total time:
Serves: 12
Ingredients
  • 1/2 cup white wine vinegar
  • 1 cup extra virgin olive oil
  • 1 tsp basil
  • 1/4 tsp oregano
  • 3-6 cloves minced garlic (may substitute 1/2-1 teaspoon garlic powder)
  • 1/2-1 tsp salt (start with less and add more if desired)
  • 1/2 tsp onion powder
Instructions
  1. Combine. Shake before serving.
  2. Store it in the refrigerator.
  3. If you need it sweeter, add the sweetener of your choice in 1/4 teaspoon increments, tasting between each.


What do you think? Simple, isn’t it? Do you make your own homemade salad dressing? If not, what’s stopping you?

Special thanks to my daughter Hannah of Horse-Crazy Bookworm for the photography, hair-styling, and food presentation, and thanks also to my little mixer and taster.  

Linked to Nomday Monday.

Disclosure: some of the links in this post are affiliate links. If you buy something from Amazon through my affiliate links, they give me some of their profits (ain’t that sweet!) and I buy olive oil and make more salad dressing. It’s all for a good cause.

10 Tips for Simplifying Complicated Relationships

Relationships make life worth living…but sometimes they can make life a little too, shall we say, complicated.

Relationships are not easy, but they can be simple. In other words, all good relationships need work, but they do not need to be complicated to be effective and enjoyable. Take the time to simplify the complicated (and even the uncomplicated) relationships in your life, and you’ll find yourself with more time, energy, and joy on your hands.

10 Tips for Simplifying Complicated Relationships {TheSimpleHomemaker.com}

10 Tips for Simplifying Complicated Relationships

1 – Be honest. Tell your spouse, your mother, your siblings that you don’t want to be called Shnooky-Pookums, Cheeks, or Stinky in public. Tell your co-workers or playdate moms that you won’t participate in the spouse bashing and to not go there around you. Tell your husband that you are just as exhausted as he is at the end of the day and really really really really really need help with the dishes so you can both sit down together and rest. Be nice, but be honest.

2 – Don’t be too honest. Don’t tell your mother-in-law that her hair is a nasty shade of putrid green if your relationship can’t take that sort of honesty. Don’t pat your wife’s (or husband’s) tummy and say, “When’s the next one due, Mama?” (My husband does not do this, by the way.) Don’t tell the Sunday School teacher that you think her dog stinks like dead fish unless the two of you are best friends and she specifically asks. These are obvious examples, but understand that some things don’t need to be said…so don’t say them. It’s just not worth it and will only end in tears…not the good kind.

3 – Limit your close relationships. Don’t try to be buddy-buddy with everybody who strolls past your front door. You do not need to be best friends with all your co-workers or homeschool group moms. It’s okay to have church acquaintances who will never move into the friend category. Limit your close relationships to those you can manage, and those who build you up instead of drag you down with negativity and perpetual neediness. (Everyone is needy sometimes, which is understandable, but you can’t hold everyone’s hand at once. You. just. can’t.)

10 Tips for Simplifying Relationships 2 {TheSimpleHomemaker.com}

4 – Don’t jump to conclusions about other people’s reactionary behavior. Understand that everyone has baggage. Everyone is hurting. Sometimes the way they respond to you comes from pain caused by someone else. It might not even have anything to do with you. Of course, you may have been a big ol’ butthead or eaten the last cookie, and therefore owe that person a whole-hearted apology, which brings us to…

5 –  Apologize and mean it. Choke down your pride and say you’re sorry, but not like this: “I’m sorry that you’re offended.” You’re not sorry! You’re just trying to appease someone and save your hinder. Be sorry. Put the relationship ahead of your desire to be right.

10 Tips for Simplifying Relationships 3 {TheSimpleHomemaker.com}

6 – Set limits. Tell your extended family and friends not to call during homeschool hours or the baby’s nap time. Tell your parents and in-laws that you don’t necessarily want them to try to fix your life. Tell your wife not to bring the kids into the office without calling ahead, or your husband to try not to interrupt (too much) during a homeschool history lesson. Tell those well-meaning people at church that you like being home with your kids and don’t need anybody to rescue you…but they can bring you cookies…and pie.

7 – Don’t be easily offended. Don’t make people walk on eggshells. Oftentimes people are in no way attempting to offend, but an overly-sensitive person launches a crisis situation. Don’t be that person!

8 – Don’t talk. Listen. I think my brother taught me this. Before you open your mouth, ask yourself W.A.I.T., which means “Why am I talking?” Seriously, you don’t need a parallel story, you don’t need to one-up someone, you don’t need to fix everything, you don’t need to talk about yourself all. the. time. Really. You don’t. Stuff a cookie in your mouth if that’s the only way you can keep it closed.

10 Tips for Simplifying Relationships {TheSimpleHomemaker.com}

9 – Understand that people will probably never change. The one-upper, the boaster, the tactless uncle, the cheesy blog writer (a-hem), the crazy aunt, the easily offended in-law, the straaaaaaaaaange cousin…chances are they’ll never change. Accept that. Besides, they’re probably saying the same thing about you right now. Wink. (If this last remark offends you, please re-read and take to heart number 7.)

10 – Keep it in perspective. So your husband forgets your anniversary. Big stinkin’ deal! He still loves you!* So your mother-in-law sends your kids a plastic toy from China that you told her was not allowed in your house. Big whap-diddly-doo! Just pass it on. Its three-day presence in your home is not going to cause your children to grow a third arm out of their right nostrils (despite what you read in the blogosphere). (Exceptions would include harmful or inappropriate behavior–use your brain.) So your 90-year-old grandmother telephones in the middle of your homeschool day. So what?! It’s your 90-year-old grandma! Turn on Liberty’s Kids for your students, get yourself a cup of tea and a slice of pie, and chat with Grandma! And say “hi” from me! If whatever-it-is still bugs ya, say your complaint out loud. Do you hear yourself? Kinda whiny and petty, eh? Yup…without the “kinda.” Put people over dates, self-imposed principles, and schedules.

Give these 10 tips a try and your relationships will thrive…or at least not suck out your lifeblood, which, in some cases, is an improvement.

What are your tips for simplifying relationships?

*This obviously does not apply to husbands who are abusive, negligent, or unfaithful. If that is your situation, please seek help from a professional. It is more than can be dealt with in a 10-tip blog post.