Peeling Hard-Boiled Eggs

Peeling hard-boiled eggs...no more bad eggs!


Few kitchen tasks make a person feel more inferior than the often bewildering process of peeling hard-boiled eggs.

Here are some save-the-day (or at least save-the-egg) tips for a clean, easy peel (almost) every time:

Peeling Hard-Boiled Eggs: The Prep

Boil the eggs properly. To learn how, read How to Boil an Egg: Making Perfect Hard-Boiled Eggs. There are other recipes which have you boiling for even less time, which is fine, but do not boil longer!

Do not use fresh eggs. If you are using supermarket eggs, don’t worry about it.  They’re not fresh.  If you have your own chickens and ultra-fresh eggs, store the eggs for a couple weeks before boiling.

Plunge the eggs into ice water to cool as soon as you’re done making them. You may need to add more ice as the water warms up. The ice causes the egg itself to contract, thus separating the egg from the membrane and shell…but you knew that, because you totally paid attention in science class, didn’t you?

Peeling Hard-Boiled Eggs: The Process

There are two main successful approaches to peeling hard-boiled eggs:

Peeling hard-boiled eggsCrack the larger end with the air bubble in it where the membrane is most separated from the egg. Get in under the membrane and start sliding the shell off with your fingers.


Peeling hard-boiled eggsCrack both ends. Then roll the egg between your palm and a hard surface until the entire shell is cracked. (Gently! You’re a 100+ pound human being.  It’s just a wee little egg.) Slide the shell off.


Peeling hard-boiled eggs

Peeling hard-boiled eggs


There is a third approach, but I hesitate to mention it.  Okay, fine, here it is.

Peeling hard-boiled eggsRandomly crack the egg and pick little bits of shell off while muttering your egg-peeling frustrations under your breath…but you already know that approach, which is why you’re here reading about peeling hard-boiled eggs.

Give the egg a quick rinse and your beautiful masterpiece is ready to…smash into egg salad.

What are your best tips for peeling hard-boiled eggs?

Thanks to reader Theresa for submitting this question. If you have a question you would like The Simple Homemaker to answer, submit it through my contact page. I would love to hear from you!


How to Boil an Egg: Making Perfect Hard-Boiled Eggs

Today I am honored to have as a guest blogger, my lovely daughter Hannah.

How to Boil Perfect Hard-Boiled Eggs...and I Mean Perfect!


It’s almost Easter! And one of the most popular signs of Easter is the Easter egg. So I’m here to tell you how to make the best hard boiled-eggs ever!

You know what I mean by “the best”? I mean a perfect bright-yellow-yolk-minus-the weird-green-color, easy-to-peel, and superbly delicious hard-boiled egg.

How to Boil an Egg: Making Perfect Hard-Boiled Eggs

What you need:

A pot and cover
Eggs–as many as you want, as long as they fit in the pot with some room to spare.
Water
A stove
A timer
A good book

How to boil an egg:

First, put the eggs in the pot and cover them completely with cool water. Set the pot on the stove.

How to boil an egg: perfect hard-boiled eggs

Turn the stove on high; as high as it will go, its absolute highest, and wait for the water to come to a roaring boil. (When I say roaring boil, I don’t mean a few little bubbles at the bottom of the pot. I mean roaring, so that someone else can hear it from the next room.) 

How to boil en egg: perfect hard-boiled eggs

When it comes to a roaring boil, set the timer for three minutes. Then wait.

How to boil an egg: perfect hard-boiled eggs

After the three minutes is up, turn off the stove, put the cover on the pot, and set the timer for seven more minutes. (Leave the pot on the burner!)

How to boil an egg: perfect hard-boiled eggs.

Then wait. Again.

How to boil an egg: perfect hard-boiled eggs

When that time is up, take the eggs off the stove and rinse them in cold water. Sometimes I get lazy and just use room temperature water. That works too. (My mother, The Simple Homemaker, cools them in ice water.)

 how to boil an egg: perfect hard-boiled eggs

That’s it! Yep, you heard me correctly. You’re all done!

How to boil an egg: perfect hard-boiled eggs

You can peel and eat them right away, or you can store them in the fridge. (It’s probably best to eat them within a week, but it’s a popular breakfast and snack in our house, so we have no trouble with that.)

So that, my friends, is how to boil an egg, the perfect hard-boiled egg.

It was cheap, it was simple, and it only took about ten minutes.

Here’s the boring printable version:

How to Boil an Egg: Making Perfect Hard-Boiled Eggs
Author: Hannah
Prep time: 1 min
Cook time: 10 mins
Total time: 11 mins
The perfect hard-boiled eggs.
Ingredients
  • A pot and cover
  • Eggs–as many as you want, as long as they fit in the pot with some room to spare.
  • Water
  • A stove
  • A timer
  • A good book
Instructions
  1. Put the eggs in the pot and cover them completely with water.
  2. Set it on the stove.
  3. Turn the stove on high and wait for the water to come to a roaring boil.
  4. When it comes to a roaring boil, set the timer for three minutes. Then wait.
  5. After the three minutes is up, turn off the stove, put the cover on the pot, and set the timer for seven more minutes. (Leave the pot on the burner.)
  6. Then wait. Again.
  7. When that time is up, take the eggs off of the stove and rinse them in cold water or plunge them in ice water until cool.
Notes

Eat within a week.

For easy peeling, read Peeling Hard-Boiled Eggs.

Enjoy your perfect hard-boiled eggs!  Happy Easter!

Horse Crazy BookwormHannah is my firstborn daughter. She was a “roadschooled” 15-year-old at the time of this writing, 2012. Now she is a budding photographer and a freelance writer who loves experimenting in the kitchen and cooking for people on restricted diets. She is currently working on a chocolate cookbook for people who can’t eat sugar, grains, dairy, or soy. Hannah makes all the hard-boiled eggs here at The Simple Home…the good eggs, anyway. She emphatically denies any accountability for yesterday’s batch of less-than-perfect eggs made by a certain someone (a-hem…her mother) who did not follow the above directions. 


Easy Scalloped Potatoes Recipe – Frugal, Classic, Delicious


This easy scalloped potatoes recipe is a classic dish to fit any budget.
 The original recipe which we adapted slightly to make our own creamy potato goodness is from Modern Alternative Mama’s cookbook, Wholesome Comfort: Whole Foods to Warm & Nourish Your Family.

Easy Creamy Scalloped Potatoes (www.TheSimpleHomemaker.com)

These potatoes are comfort food bliss served alongside Italian chicken in cream sauce with apple spice cake for dessert, all from the same cookbook.  Are you drooling yet?

Easy Scalloped Potatoes Recipe – Frugal, Classic, Delicious
Recipe Type: Side Dish
Author: Kate, Modern Alternative Mama
Prep time: 20 mins
Cook time: 1 hour
Total time: 1 hour 20 mins
Serves: 8
This easy scalloped potatoes recipe is not only simple to make, it’s so creamy and delicious, you won’t believe it’s not bad for you!
Ingredients
  • 8-10 potatoes
  • 1/2 onion minced
  • 1 teaspoon sea salt
  • 1/4 teaspoon black pepper
  • 1/2 teaspoon thyme
  • 4 tablespoons butter
  • 2-4 tablespoons arrowroot powder (or the thickener of your choice)
  • 4 cups milk
Instructions
  1. Preheat oven to 350.
  2. Peel the taters and slice them to a relatively uniform 1/8 inch. Spread them in a 9X13 pan. (Don’t be picky!)
  3. Melt the butter in a saucepan. Saute the onions until they are translucent. Try not to eat too many just yet.
  4. Add all the seasoning and your thickening agent of choice to the buttered onions. Whisk until smooth. (I usually get someone shorter than me to whisk. Pretend whisking is really fun and you’ll have plenty of volunteers. Eventually, they’ll wise up, though.)
  5. Add the milk slowly to the saucepan, stirring constantly until the mixture thickens. (Remember, milk can burn…and tends to do a volcanic eruption impression if overheated, so don’t go anywhere.)
  6. Pour the mixture over the potatoes. Pop them in the oven at 350 for an hour. Not being one who wants to wait an hour for my taters, I boiled them for ten minutes before putting them in the oven, so they were done in half the time.
Notes

For a little change in the ol’ scalloped tater routine, toss in some cooked bacon (cook it in the saucepan and use the drippings to saute the onion), cheese, broccoli, or all of the above.

Want to know what a real family thought of this recipe?  Because I’m off dairy to help our Little Miss Colic, I did not get to try this dish.  (Yes, it broke my heart, thank you for asking.)  So we polled the other taste testers.

Here’s what some members of the family thought…in their own occasionally incomprehensible words:

  • The cheese-obsessed Wisconsin-born teen: “I thought they were really good…but they needed cheese, sort of. I think it was good without cheese too, though.”
  • The food enthusiast: “Ooh, those were totally awesome!”
  • The contented, quiet child: Um, I loved the potatoes, um…and I don’t think they would have been better with cheese on them.
  • Gabbie Girl: I like them.
  • The boy who doesn’t eat potatoes: I only had one with salt on it and it was really good that way. I don’t know what it tasted like without salt.
  • The three-year-old who ate every bite: They taste like peppermint candy canes with pepper.  (She’s three, people.  Seriously.)

If you enjoyed this easy scalloped potatoes recipe, you’ll love the other recipes in Wholesome Comfort: Whole Foods to Warm & Nourish Your Family by Kate at Modern Alternative Mama.

Buy Wholesome Comfort here.

What’s your favorite comfort food?


Wholesome Comfort Giveaway

Meatloaf is my comfort food.  In fact, I am somewhat of a meatloaf connoisseur. You can keep your gourmet meatloaf.  What I love is a great big slice of homestyle meatloaf and a heaping mountain of mashed potatoes.  Gravy?  Yes please!

Wholesome Comfort Giveaway

You can imagine my culinary enthusiasm when I found a meatloaf recipe in Wholesome Comfort, the just-released e-cookbook by Kate of Modern Alternative Mama.  There is meatloaf, and then there is Meatloaf! Kate’s meatloaf recipe is Meatloaf! It’s a taste of home on a plate, a visit back to Grandma’s farm kitchen, comfort food at its finest.

Wholesome Comfort: Whole Foods to Warm & Nourish Your Family is all about comfort food.  Don’t let the word “wholesome” scare you off. These dishes are delicious and nutritious.  They contain whole foods that you will recognize, no chemically laden pseudo-foods, and no ingredients you would have to order from Timbuktu.

Most people who are attempting to transition to a less processed diet fear they must resign themselves to a life without their favorite comfort foods.  Wholesome Comfort totally debunks that fear…totally.

Want chicken and dumplings?  There’s a recipe for that.  Apple spice cake? It’s in there.  Turkey dinner with all the trimmings?  You got it!  Chicken pot pie, macaroni and cheese, chocolate peanut butter fudge?  It’s all in there!  And have I mentioned the meatloaf!?

Check out the table of contents here.

Looks good, doesn’t it?  After trying several recipes (and the meatloaf three times), I can assure you, it is good.  Try it for yourself with a free, easy scalloped potatoes recipe.

Want a copy?

Buy Wholesome Comfort here.

Here’s a great Simple Homemaker perk. TSHM readers can use the code HOME25 to receive 25% off through 1/31/12. Or you can…

Win Wholesome Comfort below.

If you are new to Rafflecopter, simply log on below. Click “Do it” on the entry methods of your choice. Follow the instructions that pop up. Some will take you away from the site, but you must come back and click “Enter” to complete each entry. It’s really quite simple!

Continue reading “Wholesome Comfort Giveaway”

Smart Sweets Ebook Review

Ever since I delivered baby number seven, I’ve been craving j-u-n-k, JUNK!  I’m talking “bake me a batch of cookies so I can eat them ALL.”  I’m talking “give me a handful of corn dogs with non-organic, nitrate-laden dogs inside and corn syrup-saturated ketchup on the outside.”  I’m talking “break out that chocolate we bought LAST Christmas.”

Smart Sweets Giveaway

We don’t have corndogs, and chocolate does not agree with me (although I totally agree with chocolate), so that left me with eating a batch of cookies all by myself.  I was up for that.

But my baby was not.  As a nursing mother, I try to maintain the same diligence in monitoring what goes into my body after the baby is born as I did before.  That means gobs of sugar are o-u-t, out. But it doesn’t mean the fun foods have to be o-u-t, out.

Smart Sweets to the rescue!

Smart Sweets: 30 Desserts to Indulge Your Sweet Tooth is a real foods dessert cookbook written by Katie Kimball of Kitchen Stewardship.

Smart-Sweets-book-cover_thumbI loved this book even before I tried any of the recipes.  Here’s why:

Information: Katie summarizes real food dessert baking exceptionally well.  She is very open about how healthy (or unhealthy) desserts are, how “smart” each of the different sweeteners are, and what your basic ingredient options are on the road to eating smarter sweets.

Adaptability: Are you gluten-intolerant, dairy-sensitive, or allergic to eggs?  You can still use this book.  Is the only sweetener you have in the house the plain ol’ white stuff?  Your dessert won’t be quite as “smart,” but you can use it.  Each recipe contains tips, alternatives, and frequently asked questions so you can adapt the recipe or baking process to suit your needs or tastes, gradually moving toward more natural sweeteners as your taste buds adapt.  Adaptability is awesome!

honeySymbols: Katie includes symbols to easily and quickly indicate allergen alerts as well as how “real,” expensive, and time-consuming each recipe is.  When you need cookies now…like totally now…the time symbol is crucial.

Ingredients: You can find these ingredients. They’re real, normal ingredients! I am elated!  In fact, most of them are right here in my pantry, and probably in yours as well.  And if they’re not, she offers many alternatives as well as advice on where to find them.

Attitude: Nowhere in the entire book does Katie give you the impression that you need to attain a certain level of “smartness” to feel good about how you feed your family.  She offers a gentle guide to making indulgent food better for you, but gives you options for wherever you are in your journey.  I love that about her.

But what about the recipes?

The recipes assuaged my cravings beautifully, and the family was happy, too.  Here are some quotes from the mouths of my children after eating desserts from Smart Sweets:

“These are fantastic!”

“May I have more…please?”

“I love these. Make them again!”

“This is a great flavor combination.”

“Don’t bother baking them. Let’s just eat the dough.”

cookie_cartoonOne anonymous person who is not a honey fan did not care for the honey flavor in the honey-molasses cookies that the rest of us loved…and then that anonymous person ate the rest of the batch after the family went to bed.  That anonymous person’s words were thereby negated by that anonymous person’s action.

We did have a texture-related incident with a pudding recipe involving arrowroot and forgetting to stir, in which case the words “worms” and “boogers” showed up, but that was the fault of the distracted stirrer (the crazy craver mentioned earlier), and not the recipe.  The flavor itself was great, and it was eaten up…boogers and all.  Had I stirred, all would have been well.

Enough talk!  Do you want to try a recipe from Smart Sweets?  Of course you do!

Download this free recipe for Apple Crisp.

Enough baking! Do you want to win a copy of the ebook Smart Sweets? Of course you do!

Giveaway Closed

Win a Copy of Smart Sweets

To enter, do any or all of the following, and leave a separate comment for each entry:

TN_9-12-07_50cSign up for my newsletter.  Leave a comment that you did so.  If you are already a subscriber, leave a comment saying so, and you will be entered.


TN_11-12-07_27cCheck out the Smart Sweets table of contents.  Come back here and leave a comment about a recipe or anything else that catches your eye. (Did you notice the bonus recipe?)

TN_9-12-07_48cShare this giveaway on Facebook, Twitter or both, and leave a comment for each share. (Feel free to like The Simple Homemaker or follow TheSimpleHome while you’re sharing, although they won’t earn you an entry.)

TN_11-12-07_26gBake the apple crisp and bring it to my house. On second thought, that probably borders on bribery.  Best skip that entry.


If you would rather not wait, you can buy your own copy, download it instantly, and use it today to bake Christmas goodies. The Simple Homemaker readers can use code SIMPLE25 to get a 25% discount on Smart Sweets until December 26.  (It pays to be a TSHM reader!) If you then win the free book, Katie will refund your purchase. (Isn’t she great?!)

Buy Smart Sweets

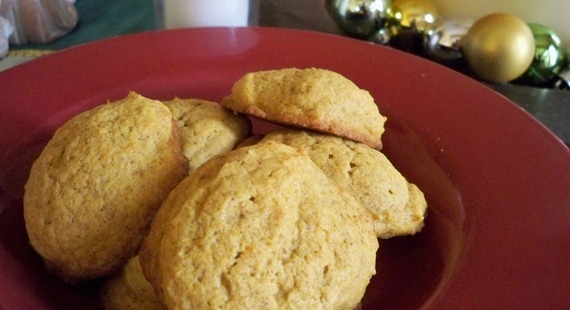
Happy (and smart) eating! I’m off to make the classic butter cake and eat more pumpkin cookies, all in the name of doing a thorough review!  It’s a tough job.

TSHM disclosure statement: Katie gave me a free review copy of Smart Sweets. (Thanks, Katie!)  That in no way influenced my review or opinion of the book.  (If it had, would I have mentioned the boogers?) In fact, I’m going to buy one of her other books, Healthy Snacks To Go, based both on how much I like this book and also on the Healthy Snacks To Go table of contents and reviews.  The links in this post are my affiliate links. If you purchase a book from Katie through one of my links, I will receive a small commission.  I will not buy corn dogs with it.

Giveaway legaleze: This giveaway is for one ebook (not a hard copy book), which will be available for download.  The giveaway ends Friday, December 16, 2011 at 11:59 p.m. PST.  It is open to anyone over age 13 the world over.  This giveaway is in no way affiliated with Facebook or Twitter.  The winner will be chosen at random and will be notified by email and on this blog.  The winner will have 72 hours to respond or another winner will be chosen…sorry!  


Brining Turkey – The Secret to a Juicy Bird

My husband Steve makes an amazing turkey.  Juicy, flavorful, beautiful, and with drippings that make the perfect gravy.

The secret is in the brine.

brine [noun]: water saturated or strongly impregnated with salt

Brining turkey can be as simple or complex as you wish it to be.  When we first began brining turkey, we used a somewhat involved recipe from Alton Brown’s Good Eats.  Over time, we realized that our results are just as wonderful with a far simpler version. Sorry, Mr. Brown–you’re smart, I’m simple, so I win. Somehow that made sense before I typed it.

Brining a Turkey via The Simple Homemaker

Print Recipe

Brining Turkey

Ingredients and supplies for brining turkey

  • 5-gallon bucket or other large container with a lid (available at Wal-Mart for $3)
  • turkey
  • 1 gallon vegetable stock (optional)*
  • water to cover
  • ice
  • 1 cup coarse kosher salt
  • 1/2 cup brown sugar (optional)

At the very least, you need ice water, salt, a container, and a bird.

Directions for brining turkey

  1. Combine the salt and sugar in the veggie stock and heat on the stove until everything is dissolved.  Cool and chill.
  2. Place the turkey in the turkey tub…the bucket.
  3. Add the stock and then if necessary, add cold water until it covers the turkey.  Place the lid on the turkey tub.
  4. If you do not have a snow bank to keep the tub in, make room in the refrigerator.  We never have that much room in the frig, so we add ice throughout the day and keep it in the coolest place possible.
  5. Brine for a minimum of six hours.  We like to brine for two days.  Whatever amount of time you can devote to brining will help your turkey “retain water” and make it juicier.
  6. Remove the turkey from the brine, rinse, and roast as usual.

* To make your own veggie stock for brining, bring a stockpot of water and veggies to a boil. Use either ends and leftovers you’ve frozen over time, or fresh veggies.  I like carrots, celery, and onion, but use whatever you have on hand.  Simmer for several hours (or as much time as you have).  Strain. Lately, I’ve been making my stocks in my Instant Pot (affiliate link) in half the time. Give me a woo and a hoo!

A note on veggie stock:

If you have guests with food issues, such as allergies, sensitivities, Celiac, or Crohn’s, please don’t use store-bought veggie stock. Many of them have ingredients in them that will make the turkey unsafe for your guest. Just use ice water or go through the ridiculously simple process of making your own stock.

A note on making gravy from the drippings:

I recently read that you may not want to brine your bird, because, while it will make the turkey more flavorful and juicy, you will have to pay attention to how much salt you put in the gravy or it may be too salty. Ahem. DUH!

If you brine your turkey and make gravy from the pan drippings, do not add salt to your gravy without first tasting it. Rinsing the bird before roasting helps reduce the salt in the drippings.

A note on other birds:
I use a simple brine on my roasted chickens as well, containing only water and salt.  My family can always tell when I skip that step.

Print Recipe

Enjoy your juicy turkey, and have a blessed Thanksgiving, remembering to Whom we owe our thanks.

What are your best turkey tips?

Excalibur Dehydrator Review – The Great Kitchen Multi-Tasker

I love a multi-tasker.  Not the burning dinner while accidentally tying a small child’s shoes together and helping a teenager mess up an algebra problem kind of multi-tasker.  I love the kind of multi-tasking kitchen tool that can manage numerous tasks with efficiency and style.

One of the great kitchen multi-tasking tools I have is the Excalibur Dehydrator.  If this thing did laundry and I were single, I’d marry it.  Let me tell you why the Excalibur oozes awesomeness.

The Maven of Multi-tasking

While some dehydrators simply dehydrate, the versatility of the Excalibur raises it to the next level.

Of course, it dehydrates.  With the racks in place, the Excalibur can make jerky and other dried goods without all the sweeteners or preservatives in the items you find at the store. The large model can handle up to nine trays of croutons, chips for crisping, soaked nuts, fresh herbs, fruit rolls, grain sprouts, homemade pasta—you name it!

It is also a great tool for crafts.  Preserve flowers, dry photographs, make potpourri, and more.

One perk over the competitors is that this monster can handle a large load all at once with little to no attention from you.  The fan in the back and the square design of the product help circulate the warm air throughout the unit.  This eliminates the need to switch racks repeatedly, or the problem of only partial racks drying.  You may still need to do the occasional switch, but it is a minor task.

Excalibur Dehydrator Review
The Excalibur Drying Our Thanksgiving Stuffing Cubes

Wait, there’s more!  Due to its removable racks, it can also serve as a warming place for whatever kitchen or craft projects you are undertaking.  Two in particular that come to mind are culturing yogurt and holding sourdough at its necessary proofing temperature.  With the racks removed, you can fit a huge bowl of sourdough or nine quart-sized mason jars full of soon-to-be yogurt inside.  You could even set a pan of water inside and use the unit as a humidifier.  I know–I’m in love, too.

Set It, Forget It, You Bet…It

All Excalibur models have temperature gauges that ensure consistent temperatures for the length of the drying period.  Some Excalibur models are equipped with timers that can be set to operate up to 26 hours and will automatically shut the unit off after the allotted time.  By setting the temperature gauge and timer, even the scatterbrained among us can avoid over-drying.

This simplifies the making of potentially touchy items such as yogurt or sourdough.  No more worrying about whether or not the yogurt will maintain the necessary temperature for proper culturing.  No more long waits for sourdough to proof in a cold kitchen.  Simply set the timer and the temperature and walk away.  (Don’t walk away for days if you’re fermenting sourdough. Think “the blob that ate Manhattan.”)

Making Yogurt in the Excalibur Dehydrator Review
Making Yogurt in Our Excalibur

My Positive Take on The Down Side

Appearance: The Excalibur is a big black plastic box, unless you purchase the white version, which is a big white plastic box.  That’s it.  No pretty dancing flowers, no stainless steel doo-dads, no fancy buttons, no radar to detect space aliens.  In fact, it doesn’t look like it should be able to do the fantastic things it does. But looks can be deceiving.  This big ol’ box can really cut the mustard…and dehydrate it as well.

Size: When I say it is a big ol’ box, I mean big!  The size of the Excalibur may leave people in a small apartment wondering where to put it.  This is when it’s time to kick up the creativity.  People keep them in bathrooms, on bedroom dressers, and in their garages.  We keep ours in the laundry room off the kitchen where it is always accessible for our yogurt making fests.  The Excalibur is available in different sizes to accommodate your needs, but I like the monster size, officially known as the 3926T (26T for 26-hour timer).

Excalibur Dehydrator Review
Our Excalibur Lives in Our Laundry Room

Volume: Some people complain that the Excalibur is noisy.  True, it does emit a steady hum when it’s running, but I personally do not find it to be a problem in the least.  Of course, I have six children—who notices a steady hum?!

Durability: Periodically I have read reports of a fan burning out or another technical issue.  I have also heard that Excalibur offers great customer service and will do what they can to honor warranties.  We have no personal experience in this area.  Despite running for batch after batch of yogurt, crispy nuts and seeds, and other goodies, our Excalibur has never had a problem…unlike nearly every other appliance that we own.  If you are concerned, there is the option of purchasing a ten-year warranty with your dehydrator, which comes free with some on-site deals.  Overall, there is a reason why Excalibur has earned its fantastic reputation.

Cost: The Excalibur is expensive.  Period.  Think nearly $300.  Fortunately, there are options to paying full list price.  Online stores such as Amazon often offer some models of the dehydrator at a discount.  Excalibur itself often runs sales or deals, such as offering free gifts or an extended warranty with purchase.  Different models sell for different prices to accommodate each customer’s needs, some barely breaking $100 in price.  Finally, Excalibur often has reconditioned models available on their site at a highly discounted price and still be eligible for warranties.

Extra Products: Some people claim you need to purchase Paraflexx sheets and a dehydrating manual to properly use the Excalibur.  Honestly, while you would need some sort of sheet for fruit rolls, we have yet to use the sheets that came free with our unit through an on-site deal.  We have also found the enclosed dehydrating guide to be sufficient for our first year with our Excalibur.

If you are interested in moving toward a more natural diet, preserving your own foods, making your own yogurt, or, hey, even drying out your sneakers, the Excalibur is a valuable multi-tasking tool.  Now, if only it could fold laundry….

Visit Excalibur to learn more.

Excalibur Dehydrator Review
Lovin' Our Excalibur Yogurt

Do you have an Excalibur (or other) Dehydrator?  What is your favorite way to use it?

Disclosure: If you make a purchase of any sort through the Amazon and Excalibur links on my site, I receive a commission.  You certainly do not need to purchase through my links, but my family and I totally appreciate it when you do!  Totally!  Thank you for reading my Excalibur Dehydrator review.