How To Bake a Ham – My Simple Recipe and Guide

I love a good, juicy ham on Easter and Christmas (and any day in between). Too often the hams we’ve had are dry, expensive and sickeningly sweet, even when we bought the high-priced, big name hams from the ham store. It’s enough to make a person sit down and cry into her taters. Therefore, we took it upon ourselves to find the cheapest, tastiest method of preparing ham that we could…just for you. You’re welcome.

How to Bake a Ham – A Simple Guide

A Simple Guide to Selecting, Baking, and Slicing a Juicy, Affordable Ham

(photo credit)

What do I need?

  • a ham
  • pan
  • one cup water (optional)
  • aluminum foil
  • meat thermometer
  • oven
  • optional ingredients for an optional sauce – ours only requires brown sugar and a sauce pan

Which ham should I buy?

The most convenient ham is, naturally, the spiral-sliced. Our experience with spiral cut, however, is that they dry out very easily. Because they are already cut, the heat has more surface area from which to draw moisture. Nothing can prevent moisture loss to some extent, not even the reams of aluminum foil we use to try and prevent its drying out.

For that reason, we buy unsliced ham, which, to our delight, is cheaper. I like the shank, because it is often the cheapest of all and not too difficult to slice. You can also grab yourself a nice butt which will work just as well for the same price or just a few pennies a pound more, depending on your store. According to our old butcher, the shank and butt are essentially the whole ham (which is the leg) chopped in half to form the separate cuts. With such little difference, I go for whichever is cheaper. (Here’s more than you ever wanted to know about ham cuts.)

Watch for a sale around the major holidays and you’ll really score big with your ol’ pigskin.

How do I cook the ham?

  1. Preheat your oven to 350.
  2. Put the ham in a pretty (okay, so it doesn’t have to be pretty) roasting pan with the bone side down, fat side up.
  3. Add one cup of water to the pan. (Some experts say not to do this, but I do it…so there, experts!)
  4. Cover it completely with aluminum foil. But aluminum foil will kill you! I know, but this ham is so juicy, you’ll die happy.
  5. Cook to the proper temperature as explained below, and immediately remove it from the oven.
  6. Let the ham rest covered for 20 minutes or so before slicing, so the juices redistribute throughout the ham.

How long do I cook the ham?

If the ham is pre-cooked, heat it to an internal temperature of 110-140 (Fahrenheit) and pull it from the oven, depending on how warm you want your ham. (If it’s fully cooked, you can theoretically eat it cold.)

If the ham is not pre-cooked or only partially cooked, heat it to 150-155 (Fahrenheit) and pull immediately. I know the meat police say 160, but it will continue cooking 5-10 degrees after you pull it. I pull at 150. If you wait for 160, you may have a dry ham. You’ve been warned.

Use a meat thermometer! Insert it well into the meat, but not touching the bone. if you don’t have a meat thermometer and you cook meat, buy one. If you don’t want to buy one, you’ll be cooking roughly 20-30 minutes per pound, but I won’t guarantee that your stove doesn’t run hot and that you won’t be eating a football. In that case, I wash my hands of your ham.

This is my meat thermometer:

IMG_5390

You can buy one here.

What do I do about a glaze?

I won’t even go there! Okay, maybe just a little. There are as many ham glaze recipes out there as there are cooks to prepare them. Personally, I don’t like to be knocked out by an overwhelming shot of sugar, bourbon, cloves, or pineapple when all I really want is a nice big mouthful of meat. I want to taste the ham! Is that so wrong?!

Are you with me? It’s okay if you’re not, because you can do a quick search on any recipe site for half a gazillion glazes. Here are 68 glaze recipes from my favorite recipe site, AllRecipes.com. Read the reviews and pick your favorite…but might I recommend you keep it simple?

Because my husband likes the option of a subtle sweetness with his ham, and others in my family like the option of eating ham without going into a diabetic coma, this is the method he whipped up:

The Simple Homemaker’s Husband’s Simple Ham Sauce

  1. Pour the pan drippings into a saucepan.
  2. Add 1/4 cup or so of brown sugar or honey (depending on how sweet you want it and how much juice you have).
  3. Heat it on the stove stirring to dissolve the sugar or honey, and testing for the sweetness level you’re looking for.
  4. Adjust with water if it’s too salty or thick, and sugar or honey if you want a sweeter juice. Taste as you go and adjust gradually.
  5. Serve it on the side as an optional au jus.

It is simple and delicious, but doesn’t coat the ham with sugar, which many people in my family can’t (or won’t) eat.

baked ham 2

(photo credit)

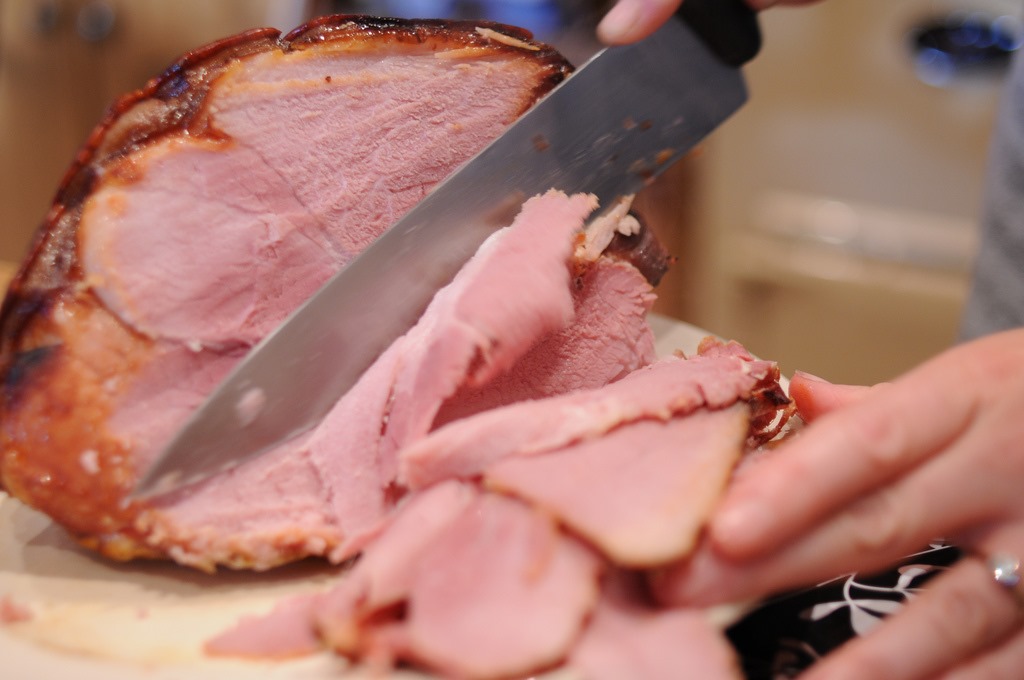
How do I slice a non-sliced ham?

  1. Insert your knife parallel to the bone and cut entirely around it. (Remember, the two L’s in the word “parallel” are parallel to each other, if you forgot your basic math.)
  2. Slice perpendicular to the bone to make nice slices that should fall away from the bone. (You will be cutting into the length of the bone, not the end…obviously.) Do this on either side of the bone.

There will be quite a bit of meat left on the bone, just as with the store-bought spiral cuts. I like to gnaw on this when nobody’s looking remove this meat later with a small knife and use it for any number of recipes needing diced ham, including scrambled eggs, bean or potato soups, fried rice, quiche, breakfast potatoes, salad.

Save the bone and toss it into a soup, crock of beans, or pot of jambalaya.

Here’s the boring printable version of how to bake a ham:

How To Bake a Simple Ham

Author: Christy, The Simple Homemaker
Prep time:
Total time:
A simple, juicy, affordable ham that will not put you into a diabetic coma…at least, I hope it won’t.
Ingredients
  • a ham
  • pan
  • one cup water (optional)
  • aluminum foil
  • meat thermometer
  • oven
  • optional ingredients for an optional sauce – ours only requires brown sugar and a sauce pan
Instructions
  1. Preheat your oven to 350.
  2. Put the ham in a pretty (okay, so it doesn’t have to be pretty) roasting pan with the bone side down, fat side up.
  3. Add one cup of water to the pan. (Some experts say not to do this, but I do it…so there, experts!)
  4. Cover it completely with aluminum foil. But aluminum foil will kill you! I know, but this ham is so juicy, you’ll die happy.
  5. Cook to 150 using a meat thermometer if your ham is uncooked or partially cooked. If it’s fully cooked, warm it to your desired temperature, but no warmer than 140 or you may dry it out. Blech.
  6. Immediately remove it from the oven.
  7. Let the ham rest covered for 20 minutes or so before slicing, so the juices redistribute throughout the ham.
  8. Remove the drippings to a saucepan over low heat. Stir in 1/4 cup brown sugar or honey, taste, and add more if desired to sweeten the juices to your desired sweetness. Serve on the side so everybody is happy!


I hope your ham turns out as juicy and delicious (and affordable) as ours! Good luck!

Let me know what you think, including your best pointers on how to bake a ham…a simple ham.

But if you talk about scoring the outside in cross hatches, stuffing cloves all over, dousing it in bourbon, and then adding pineapple and maraschino cherries, I’ll know you didn’t really read this post and don’t embrace my “simple” philosophy. (Wink.)

I’m embarrassed to admit that I have no pictures of our own hams. Years of ham baking and experimentation, and nothing to show for it but full tummies. Special thanks to all the photographers credited above…but our hams look juicier. A-hem.

Christy’s Simple Tip: Use a Whisk to Pick Up Eggs

Use a Whisk To Remove Eggs from Boiling Water or Dye Pinnable

Use a whisk to remove Easter eggs from a cup of dye without coloring your fingers, or to lift boiled eggs out of hot water without burning your hands and without dropping the slippery little buggers from a spoon. This also works to remove them from ice water if you cool your eggs after boiling.

Simple press the whisk onto the egg, and the little stinker should pop right through the loops on the whisk.

To remove the egg, separate the wires a tad and the egg should pop right out. If it doesn’t come out, it doesn’t deserve to be free.

Of course, if you like your kids to show up at church on Easter Sunday with dyed hands and wrists, you won’t want to use this technique. For our family the dyed hands on Easter are a tradition, and I’m not one to break with tradition.

I think I’m going to bring a whisk to the next egg-and-spoon race we’re invited to. That’s not cheating, is it?

To see your favorite simple tips featured on The Simple Homemaker (including a link to the page of your choice), please submit it through my contact page or send an email (pictures are optional) to TheSimpleHomemaker at gmail dot com with SIMPLE TIP in the subject.

Give Your Children a Sense of the Resurrection

This post contains affiliate links.

It’s Ash Wednesday, the beginning of the Lenten season and a time when Christians focus on what Christ did for them both through his life and more specifically through his death. Then it all culminates in the glorious resurrection of Easter morning. I’m giddy about Easter.

Over the years I’ve used several approaches to bring the magnitude of this home to my children and to awaken in their small hearts an awareness of and appreciation for Christ’s sacrifice. No, I’ve never used the give-up-chocolate-for-Lent approach. I want them to look forward to this time of the church year, not dread it. I want them to enthusiastically celebrate their Savior.

Today Amanda White launched her new hands-on ebook that will do just that, help children enthusiastically celebrate their Savior.

Give your Children a Sense of the Resurrection: a brilliant new Easter experience from Amanda White, creator of Truth in the Tinsel.

Why does the name Amanda White sound familiar? She is the author of Truth in the Tinsel, the hands-on Advent program I love. Oh yes, her!

Amanda’s new Easter book is called Sense of the Resurrection: An Easter Experience for Families. It brings to life the elements of holy week using the child’s senses and hands-on family activities. It’s brilliant!

Straight from Amanda’s mouth…or keyboard:

This ebook is not a dissertation, exegesis or commentary on the biblical account of Jesus’ death and resurrection. It’s an experience for parents to lead their kids through the story. We will not be learning every single detail of the story. There is so much historical and traditional background that our 21st-century brains can hardly understand it anyway. What we will be discovering is who Jesus is and why He came.  

I have yet to share Sense of the Resurrection with my children, since it just launched today, but I have read it and I am excited to spend twelve focused days working through the projects with my clan, including my older children who can explore some of the ideas for digging deeper. Of course, I’ll tweak it a wee bit, because I’m an obsessive tweaker. Tweak tweak.

Those of you who know me know that I have difficulty finishing what I start. Life gets in the way, and I always bow to life. One thing I love about Sense of the Resurrection is that I have 50 days between Ash Wednesday and Easter morning to accomplish 12 days of activities. That leaves room for our traditional Easter and Lent activities, oh, and life.

Celebrate your Savior with us this year. Click through this link to see what Amanda says about Sense of the Resurrection.

Please share this post to help other families awaken a love of their Savior in the hearts of their children. A simple pin could have far-reaching effects.

This is an affiliate link, which means if you buy through this link, I will receive a portion of the proceeds. If you want to bypass my link, you may do that. I will not feed you to the alligators. Really, I won’t.

5 Make-Ahead Christmas Morning Breakfast Recipes

When I was a wee lass, we woke from our dreams of dancing sugarplums to a Christmas morning breakfast of 27 varieties of Christmas cookies: fudge, snickerdoodles, chocolate-covered pretzels, chocolate crackles, spritz, and 22 others, including my personal favorite, pecan fingers. Drooool! It was this ol’ gal’s a child’s dream breakfast! Yeah, my mom rocked the motherhood thing! Because she had done all the baking ahead of time, there was no cooking for Mom on Christmas morning. Smart mom!

It turns out I’m not quite as much fun as my mom on Christmas morning. Translation: no cookies for breakfast. Bummer. I know, I know…but it’s a blood sugar thing. Christmas breakfast at The Simple Home must meet these basic requirements:

1) Minimal sweeteners

2) Protein for blood sugar or I will turn Grinch-green!

3) Carbs to stick to the ribs all morning

4) Little to no work in the morning, because I’m a Christmas morning lazy butt nobody wants to wait around for me to cook when there are stockings to pillage.

5) Delicious!

Here are some of my top ideas for a breakfast that fits all (or at least most) of the TSHM criteria for a Christmas morning breakfast.

5 Make-Ahead Christmas Morning Breakfasts -- Make it a tradition!

5 Christmas Morning Breakfast Ideas

1) Gingerbread waffles–personally, I don’t have time for waffles on Christmas morning, because we have chocolate-filled stockings waiting. Still, doesn’t this recipe from At The Picket Fence look divine. I would make them ahead of time and pop them in the toaster on Christmas morning–brilliant! (Yup, I just patted my own back. Pathetic.) Just so you know, if you use margarine instead of butter I will disown you, and if you’re not family, I will make you family and then disown you, and you know I’m insanely serious about that.

2) Overnight crockpot oatmeal–this is healthy and kinda boring, but you can make it more exciting with these 40 topping ideas from This Chick Cooks. How about a big fat chocolate santa right in the middle of each bowl. Wheeeee! (Might as well just go with the cookies.) Here’s a recipe for crockpot oatmeal from Mommy’s Kitchen. Some of my kids would disown me if we had oatmeal at Christmas, and I know they’re insanely serious about that!

3) Overnight French toastthis recipe from Pioneer Woman has masses of sugar in it, which is in obvious violation of TSHM Christmas breakfast requirement number one, but who cares? (I know–eat the cookies!) I would use my super simple homemade bread recipe…or I would buy a 99-cent loaf of bakery bread any ol’ place and be happy. (Hey, did you notice that “toast” is not capitalized? Only “French” is proper and therefore capitalized. Take note. It matters…to nobody except me.)

4) Freezer smoothies–assemble the smoothie ingredients in advance as suggested in this post at Keeper of the Home. Skip the sweetener and have an extra cookie. Yum. If you have a wimpy blender, set the bags of fruit out to thaw for a while before blending. If you have a power monster, like a Vita-Mix or Blendtec, just grind those babies up.

5) Egg bake–this right here is our go-to Christmas morning breakfast…followed rapidly by a Christmas cookie tray. See, I’m fun. Wheeee! Our two favorite breakfast casserole recipes are from my grandma and from Father Tim in Jan Karon’s Mitford Cookbook and Kitchen Reader. Father Tim’s is appropriately titled Father Tim’s Christmas Morning Breakfast Casserole. We just call it delicious. Check it out here. If you want to go all out and make your own breakfast sausage, here’s the basic recipe we use; actually, we’ve changed it so much, there’s no resemblance. Sorry.

Have a wonderfully delicious Christmas morning!

What do you serve for Christmas breakfast?

Image from Flickr; alterations mine.

Twelve Weeks of a Simple Christmas — Week 12

Last week you finished up everything that can be done ahead of time. You’re prepared for guests or travel, your gifts are ready to go under the tree, other gifts have been mailed, cards have been sent or intentionally abandoned, cookies fill your freezer or pantry, outfits are hanging up, the house is decorated, and everyone is smiling because you’ve been spending time with them and enjoying a stress-free holiday season.

Here comes my favorite mission and the reason you have everything ready early.

Twelve Weeks of Simple Christmas Week 12: Help Others -- the best mission of them all!

Contact someone on your love list. Your love list is a list of people you love–brilliant naming, I know. (You don’t need a real list—it’s in your head).

See if they need any help with anything—shopping, wrapping, decorating, addressing cards, cooking, baking, a ride to the store, or just some Christmas cheer. Or get in touch with a local church or shelter and see how you can help.

Please make this a loving habit year round in honor of the Christ child, and not simply a holiday affection overflow.

It’ll be the best mission of all!

Next week I’m not sending you a mission, because you know what you still have to do, and that’s completely different for everyone. You have the last-minute (or festive minute as I prefer to call it) items to accomplish. Prepare any festive minute foods. Do a final clean up of your home—easy since you don’t keep clutter and you already prepared for guests. Curl six heads of long hair–or is that just on my list?

Then put your feet up and enjoy some cocoa while the rest of the world runs around in a flurry of last-minuteness. I’m so excited for you!


Don't stress this Christmas!

Totally Unprepared for Christmas? Just do this.

So you jumped ship on the Twelve Weeks of a Simple Christmas missions and now you’re kicking yourself and possibly your dog, Max. Poor Max.

First, don’t stress. Stress stinks like hot chocolate gas–nasty that.

Second, stop kicking poor old Max. And don’t yell at your kids. And don’t be mean to your husband or your mother or the poor kid in Kohl’s trying to earn a little Christmas cash. Just be nice.

Third, I’m not going to lecture you on Jesus being the reason for the season and that Christmas is still Christmas even if you don’t have gifts for your kids. That is super true, of course. I mean, super-duper true. Super-de-duper-de true! (I lost my thesaurus.) But the fact is, you want to give your children presents–I get that, so let’s get it done. 

Jump on my Festive Minute Train (that’s a nice way of saying Last Minute Train) and let’s get this Christmas prep chugging along.

IF you're unprepared for Christmas and starting to stress, this post will help you get it done.

Here’s what you’re going to do:

1. Get a piece of paper and a pencil…oh, and the budget you keep firmly attached to your body at all times.

2. Write down everything you need to get done. Ask my four-year-old about the differences between need and want.

3. Cross off the things you don’t really need to do. The cards can go. The fancy up-do appointment–really? Is it necessary? A manicure. Come on here. Let’s all just be real. Buying another new dress? What’s wrong with last year’s outfit? Cross those things off! Look, you’re halfway finished with your list and you’re still sitting on your keister!

4. Simplify the things you really want to do but are going to stress you out. You wanted to cut a tree, but Walmart has pre-cuts for 20 smackeroos. Just get one. You wanted to do a fancy Advent activity every night. If all you can get around to is reading Luke 2 and singing Away in a Manger, that’s beautiful! You really want to make cookies with the kids. So maybe you won’t get a dozen or so homemade cookies done, but you can follow Sandra Lee’s example and do semi-homemade. Dip some Oreos in chocolate and put sprinkles on them. Lovely! Dip pretzels in chocolate and drizzle a different color chocolate over the top. Dip anything in chocolate! Buy sugar cookie dough. Nobody’s judging, and if they are, they don’t get your cookies–send me their share.

5. Simplify the gifts. If it’s homemade and it isn’t nearing completion by now, forget about it. Gift cards might just be the way to go this year. Write it all down.If you are a visual person like I am, barricade yourself in a room, lay everything out, see what’s missing, and fill in the blanks. Buy it online. Done. Do it tonight!

6. Simplify wrapping. Homemade–forget it! Quick wrap is just fine, and so are gift bags, although I find them expensive. Let the kids help–happiness trumps perfection.

7. Make all the necessary phone calls and record everything on your calendar. Who’s hosting? Who’s bringing what? When are the kids’ programs? When is the office party? Write it all down.

8. Plan the menu for Christmas week. Just do it. Stop grumbling. Remember that enough is as good as a feast, so don’t go overboard. There’s no shame in ordering a ready-made meal from your grocery store. Serve it with a smile on your face and it’s all good. It’s all good!

9. Make a shopping list for groceries.

10. Shop. Don’t drop. Do shop. You have to get groceries anyway, so get your Christmas food at the same time.

11. Postpone anything (including school) that doesn’t have to do with Christmas until after the holidays…unless it’s paying bills or another time-sensitive necessity. Do brush your teeth.

12. Breathe! Sit and watch a movie with the kids and breathe.

13. Speaking of kids, let them decorate this year. Or just do the very basics. It doesn’t have to be Better Homes and Gardens. It does have to be Happy Home and Heart

14. Do yourself a huge favor and get the laundry done this week. Clean all the church clothes and set them aside and don’t let anybody who’s been dipping things in chocolate anywhere near them.

15. Call your grandma or your mama. Don’t rush it–just let them talk while you listen. It will be the best present they get this Christmas…even better than the chocolate-dipped-Cheerios your kids are inspired to create while you’re on the phone.

That’s that. If you do one or two of these a day, you’re finished with a little breathing room for Christmas. Please please please don’t stress. Just start at the top and move down, repeating numbers 11, 12, and 15 at will.

Keep it merry!

Thanks for the photo, Leland! (Text mine.)

Twelve Weeks of a Simple Christmas — Week 11

Unless you are my super-organized friend Tammy or my seeeeester Karen, you probably have a few missions from the Twelve Weeks of a Simple Christmas to finish up. That’s what we’re doing this week–putting the bow on our Christmas prep.

Twelve Weeks of Simple Christmas Week 11

Take a peek at all your presents. Has everything been wrapped? Delivered? Shipped?

Are your stocking stuffers organized according to person–I use shopping bags, but you can use whatever you want.

Take a look at your house–is it cheery and bright?

Take a look at all your cards. Have they been sent out and the rest put away for next year?

Take a look at your menu? Have you purchased all the non-spoilables? Have you labeled them with coal-in-the-stocking threats so nobody touches them? Do you have a shopping list of what you’ll need to purchase later? Do you have a write-up of when to do what?

Have dinner invitations been sent? Is your home prepared for guests?

Is your calendar filled in and up-to-date? Did you include family fun down-time, like watching the Grinch and eating popcorn from the $5 tubs at Walmart?

Are your clothes ready for the season?

Is your freezer FULL of cookies?

If yes, you are set. If no and you’re feeling stressed, consider crossing things off your list and not doing them. If no and you’re not stressed, start at week one and work your way through the list, finishing up each week until you’re ready for next week’s mission, my personal favorite–no, it’s not about cookies.


Don't stress this Christmas!