
I don’t normally post crafts on TSHM. It is too easy to become mired under a pile of wanna-do’s and feelings of inadequacy, and I don’t want to increase that by making you feel like you should do more…more…more. But…crafts are fun, and as long as you commit to not overdoing it, I will post the occasional simple, affordable, totally doable project. Cross your heart? Okay.
I saw this simple and charming mason jar ring pumpkin on Pinterest.

We have loads of mason jar rings just screaming to be a part of our Thanksgiving décor. I can respect that, so I popped through to the original post at Simply Klassic, where I learned two things: 1) Kristin, the original crafter is a terrific photographer and wonderfully creative, and 2) this craft is indeed simple, free, and quick.
My four-year-old ballerina and I threw this charming pumpkin together in 15 minutes Kristin did it in five), and everyone who has seen it has said, “Wow, where did you get that?”
My ballerina did most of the work while I made dinner, but because I tied the string, she refuses to let me say that she made it alone. She keeps a body honest.
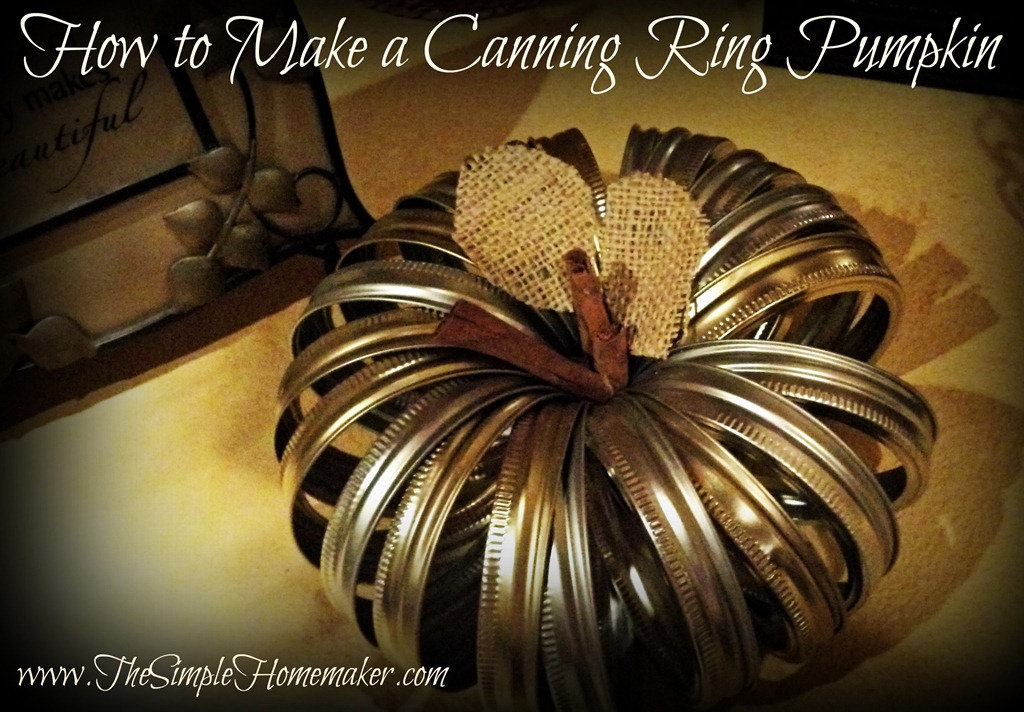
How to Make a Canning Ring Pumpkin
Supplies:
- 20-ish mason jar rings (I would go about 24. Ours could use 2-4 more)
- small piece of string—a foot or so
- cinnamon sticks or real sticks
- burlap or other material or real leaves
- one enthusiastic four-year-old ballerina, the cuter the better
Directions
String the rings on the string (it worked better when we put them all on in the same direction).

Tie the string tightly and cut away the excess.
Stick sticks (cinnamon or otherwise) in the center.
Cut out leaves and plop ‘em on top. (I drew them on the burlap for Rebecca.)

I called it complete at this point. If you want, however, Kristin says you can spraypaint the rings orange or white. I think it would be quaint to give them a weathered look with brown paint that you’ve either watered down or rubbed off immediately after painting it on. I need to use our rings to make yogurt in our Excalibur dehydrator, so we left them plain. (Plus paint equals more time and mess and less simplicity, and my ballerina was not interested in replacing her tutu with a paint shirt.)
That’s it!
Bask in the magnificence of it all. Name your pumpkin (Becca named ours Olivia Faith). Take pictures. Pin them, post them, send them to your mom (don’t forget to tell her you love her, and say “hi” from me).

If you make the canning ring pumpkin, send me a picture on Facebook!
Special thanks to Kristin at Simply Klassic for sharing this craft with us, and letting me share it with you. Go check out her end result using older, tarnished rings—very charming.
For more simple ideas, follow my Simple Thanksgiving board on Pinterest.

Oh my gosh! I totally have this pinned! We’re twins separated at birth.
Of course you do! I knew that. (ESP–common in twins.) 😉
Love this! Thanks for sharing!
It’s a fun little activity!
pinned, this is awesome! I’ve been wanting to do a post rounding up ways to use mason jar rings and lids – definitely going to include this
Thanks, Sara! Your kids would have fun making this.
SO cute! Love it 🙂
Thanks, Mindy! We had fun with it.
awesome and simple plan to make a few for gifts tks
Great idea to make these for gifts! I hadn’t thought of that. Thanks for the idea.
Love this. Plan on making some for the tables at my husband’s retirement Marty. I have TONS of canning lids.
Thanks so very much.
They’re super fast, easy, and cute! Enjoy, and God’s blessings to your husband on his retirement.
I think these ideas are great. Would love to see more with the tutorial and a way to sign up for future items!
This is a cool way to reuse….paint the rusted ones to make them pretty again and then make one of these out of it! You could even use metallic paint! Thanks for this lovely idea!
I was thinking of a rustic red paint. I’m a read kind of person. 🙂
Thanks for dropping by!
Can I get these at a store or do I have to collect them via homemade goodies?
Hi Becky!
I’ve seen canning rings wherever canning supplies are sold, such as Walmart. Have fun making it!
These rock my face off. Just like you. Promoting like crazy!
Aw, thanks!
Looks very good. My sister and I decorate church tables for Thanksgiving & our handmade paper mache pumpkins are looking kinda bedraggled. This may be a substitute or the book pumpkins. Thanks for the ideas.
Great idea!
I’d love to try the book pumpkins someday, but I just can’t part with my books…especially since we’re heavily Kindle-based these day. Kindles don’t make good pumpkins. 😉
absolutely the cutest thing on earth!!
🙂 Thank you! 🙂
Double smiles for that compliment.
These can be made much quicker and easier with zip ties instead of string.
Thank you, Lowe Ann.
This is absolutely beautiful I just wish I was Crafty and I would make one for me and my mother in law. Might just be time to call me Step Daughter to ask if she would make all three of us one if I get her the supplies.
Glenda, believe me, I’m not crafty myself! This is super super simple!